Scrape data
Use the web scraping steps to pull structured data (tables, lists, product grids, search results) from any webpage. This page walks you through adding a scrape step, selecting the data you want, handling pagination, and tuning the scraper for speed.
Add Get data from a URL
Open the step finder and add Get data from a URL. It includes a built-in Go to page field so you can enter the URL directly.
If your automation already has a Go to page step, add Get data from bot's current page instead. It scrapes whichever page the automation is on when it runs.
Select the data
Use the selector tool to tell the automation which data to extract.
- Click Select.
- Click the first piece of data on the page.
- Click a second matching element. The selector tool uses both clicks to generate a selector that matches every similar element on the page.
- For the most reliable selector, pick one element near the top of the list and another near the bottom. This helps capture the full set.
Note: For a deeper walkthrough, see the selector tool guide.
Set a pager
If the results span multiple pages, set a pager so the automation moves through all of them.
- Click Set pager.
- Select the pagination element, usually a Next button or a page number link.
- Selecting the pager by its text (for example, the word
Next) is often the most reliable option.
Learn more about setting a pager.
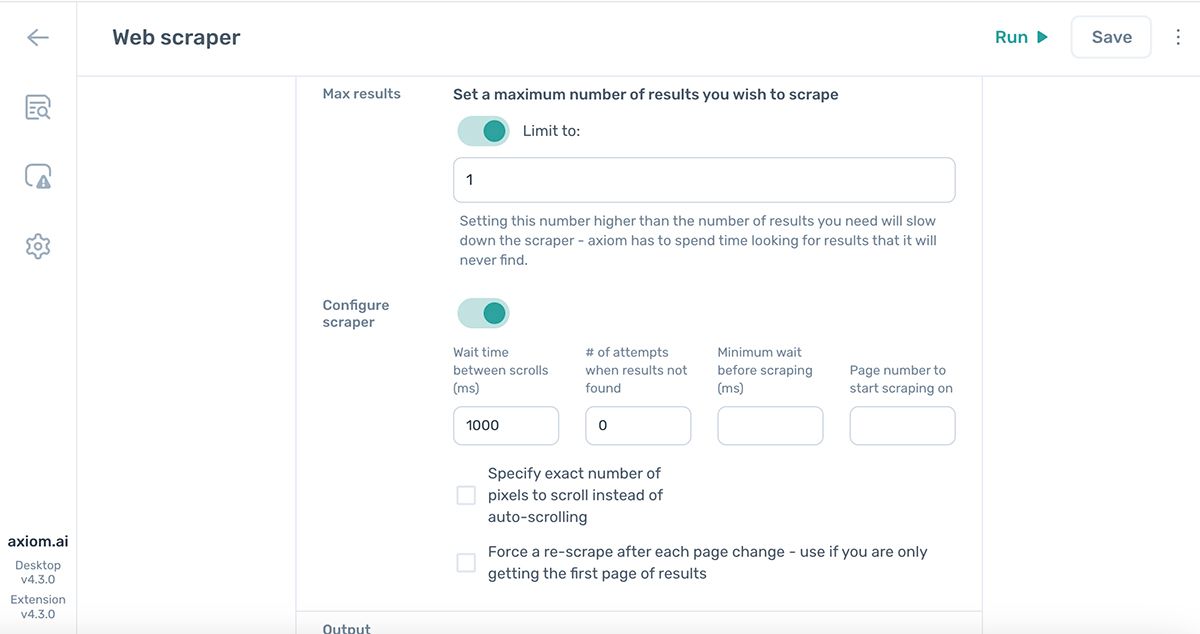
Cap the number of rows
Use the Max results field to cap how many rows the step returns.
- Set it to
1when you only need a single row of data. This is much faster than scraping the full page. - Leave it blank to scrape every match the selector finds.
- Set it dynamically from data in a previous step when the limit changes per run.
Configure the scraper for speed
The web scraping steps default to settings that favour accuracy over speed. Pages often keep loading data for several seconds after they first appear, and scraping too quickly can miss content.
Toggle Configure scraper on to expose the options below. After changing any of them, run your automation and check that the output is correct.
Wait time between scrolls (ms)
How long the automation waits between scrolls. Some pages load more content as you scroll, and the default handles most of them. Increase this value if content is loading too slowly to be captured.
Number of attempts when results not found
How many times the step retries the scrape when it can't find matching elements. Many dynamic sites update content after the page first appears, so retries improve accuracy.
Reducing retries is the single biggest speed improvement you can make. If the earlier steps in your automation already give the page time to load, try setting this to 0. Test the result carefully: too few retries can cause missed data.
Minimum wait before scraping (ms)
How long the step pauses before each scrape. Lower values run faster. If content is still loading when the scrape starts, it can be missed, so test any reduction.
Page number to start scraping on
On paginated pages, set the page number to start scraping from. Useful for resuming a partial run or skipping early pages.
Specify exact number of pixels to scroll instead of auto-scrolling
By default, the step auto-scrolls: it scrolls down to load content, waits, scrapes, then scrolls again. Use this field to override that behaviour and scroll a fixed number of pixels each time instead. You rarely need to change this.
Force a re-scrape after each page change
Tick this box when the step returns the same data on every loop iteration. It's a rare edge case, but forcing a re-scrape resolves it.
Use the output
The step renders a preview of up to three rows below it in the Builder, so you can check the shape of what you scraped before running the full automation.
Scraped data is returned as a 2D array of rows and columns. Each matching element on the page becomes a row; each piece of data you selected becomes a column. Reference the output with the Insert data button in any later step and pick either a single column or multiple columns to pass through.