5 Methods of Triggering an Automation

Now that you have created your automation, it's time to learn about the different methods of triggering the automation. There are quite a few different methods of triggering your automations, which one you choose really depends on your use case and what works best for you and/or your team. We will review a few different methods of triggering your automations in this article:
Each trigger method has it's own advantages and disadvantages and ultimately the one you choose will be determined by your needs. Let's dive into these methods and give a bit more detail to help you decide what works best for you.
Manual
Manually triggering your automations is one of the easiest ways to trigger your automation and requires no set up to get started. There are two methods of triggering your automation manually:
- From the Builder, hit "Run".
- From the Dashboard, hit "Run" on the automation you wish to run.
Manually triggering your automations has a lot of benefits, such as being able to test your automations and watch the run to diagnose any issues. This allows you to simplify a complex process into a single button click that can be run whenever you need.
Scheduling
Scheduling your automations increases the autonomy of your automations - say that fast 10 times in a row! This feature allows for the automatic triggering of your automations on a schedule that fits your needs. Availability and the frequency that you can set your schedule will depend on your current subscription plan, see Pricing for more details.
Your scheduled automation can be set to start on a specific date and will continue to run at the frequency that you have set until you manually cancel the schedule. For example, if you set it to start on the 1st January at 1am with a frequency of 1 day, it'll first run on 1st of January at 1am, and then run every 24 hours after that.
To increase the autonomy of your automations, we run your scheduled automations on the cloud - this means that you don't need to have your computer turned on for the automation to run. This can be super helpful for doing behind the scenes tasks, like getting the previous days sales numbers so you can hit the ground running when you get into the office. We appreciate that there are times when you may wish to run these locally - you can change this at any time, but your computer will need to be turned on and your browser open for your automation to run successfully.
This method of triggering automations uses paid features, see pricing for more details.
Zapier
Zapier can be used to trigger your automations from a larger workflow. This allows you to access their library of over 7,000 integrations that can be used to pass information into an axiom.ai automation. Need to trigger an axiom.ai automation everytime a new lead comes into Salesforce? You can. Want to make a log of uploads to a YouTube channel? You can. Need to pull in order details from Amazon Seller Central into an axiom.ai automation? You guessed it - you can!
To get started, select your trigger from the list of apps available in Zapier and set up your Zapier flow like normal. For the example below, we are going to create a workflow that triggers an automation when there is a new post in our Reddit community using an RSS feed. This automation will log the new post in a Google Sheet and trigger a Slack Workflow that'll notify our team of new posts.
Let's jump over to Zapier and do the following:
- Create a new "Zap".
- Add the "RSS" app as the first step, set the "Trigger event" to "New Item in Feed" and configure as instructed - we are using https://www.reddit.com/r/axiom_ai/.rss RSS feed.
- (Optional) Add a "Filter" step, and configure this to check the author name for anyone you may not want to be notified of posts from - in our case, we don't need notifications when we share new content!

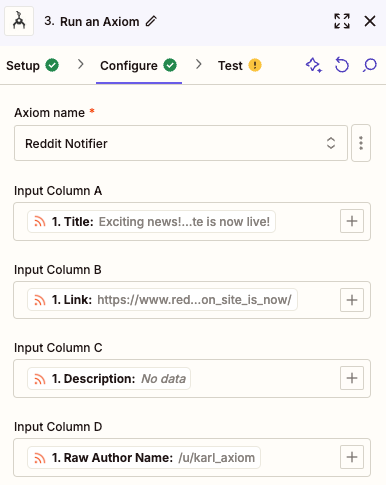
- Add another step and search for "axiom.ai", set the "Action event" to "Run an Axiom".
- Configure as instructed, setting the automation name to match the name of your automation within the extension and setting the output from the "RSS" step into your column inputs using the "+" on the right of each "Input column".
- Click "Publish" when you are ready.
Now, let's jump over to your axiom.ai automation.
- Create a new automation.
- Add the Receive data from another app step, configure the "Test data" input with a sample of the data you expect to receive. For our example, we used the following to replicate the data we are expecting: "title, link, description, author".
From this point, you can add any steps that you'd like to use within your automation to get to your end goal. Use the "Insert data" option to access the data that was received by the "Receive data from another app" step. For multiple rows, you will need to use a Loop through data step to loop through each row of data to use the data within other steps. We have a few more things to add to complete our Reddit notifier.
- Add a Write data to a Google Sheet step, configure as instructed and click "Insert data" to select the
[webhook-data]from the dropdown - this will push the data received by the automation into your Google Sheet. - We want to send this along to our customer support team to ensure that our users get the support they need, add a Trigger webhook step to send your data to a Slack Workflow. For more details on setting up the Slack Workflow, see our guide on How to trigger a Slack Workflow with axiom.ai.
- Click "Save" when you're ready.
Now, head over to your Zap and hit "Run" to test, or create a new post on the subreddit.
Keep an eye out in Zapier for any errors that may have occurred and follow their instructions to resolve the issues. If the issue has occurred within axiom.ai, you'll find this error noted in the Run report of the automation. See our How to debug guide for helpful tips on debugging your automations.
This method of triggering automations uses paid features, see pricing for more details.
IFTTT
Similar to Zapier, IFTTT unlocks a massive library of over 900 services that you can use to automate workflows and trigger your axiom.ai automations. Where IFTTT differs is in the services that it connects to - they offer various connections to social media platforms, such as Facebook, LINE, and Instagram, as well as IoT services like Hue, Honeywell, and Govee. You are only limited by your imagination when you combine axiom.ai and IFTTT.
Here are some ideas on how to use IFTTT and axiom.ai to get you started,
- Keeping a log of app updates using the IFTTT Apple App Store integration and axiom.ai's Write data to a Google Sheet step.
- Trigger an automation using the Alexa integration and axiom.ai's API.
- Re-post and log your LinkedIn posts using the LinkedIn integration and axiom.ai's templates.
While axiom.ai does not have an official integration with IFTTT, triggering your automations is simple. See our guide on How to trigger axiom.ai automations using IFTTT for more details.
To get started, create your IFTTT workflow as normal - selecting a service you'd like to trigger your axiom.ai automation from for the "If this" portion of your workflow. In order to trigger your axiom.ai automation, you'll need to add a "Webhooks" action to your IFTTT flow. You'll need to configure this action as per the instructions below:
- Set the "URL" to our current endpoint:
https://lar.axiom.ai/api/v3/trigger. - Set the "Method" to
POST. - Set the "Content type" to
application.json. - Configure the "Request body" as per our API | Triggering an automation documentation.
Adding data from your trigger into the "Request body" field will allow you to send information from your service of choice for use within your axiom.ai automation.
This method of triggering automations uses paid features, see pricing for more details.
API and other services
In addition to our official Zapier and Make integrations, we offer the ability to trigger your axiom.ai automations from nearly any third-party service that offers the ability to send outbound webhooks. Using the axiom.ai API, you can send data from a third-party service to be used within your automations. Common uses cases of this include:
- Connecting a service that we have yet to build an integration for.
- Connecting to internal services that your organisation utilises.
- Writing custom scripts that trigger your automations, batch files using cURL, for example.
Want to request a new integration? Add your thoughts to our Feedback Megathread over on Reddit.
This method of triggering automations uses paid features, see pricing for more details.
Final thoughts
While each method does have it's advantages and disadvantages, there are some things that you should be aware of when using an integration, the API or a schedule - as automations that are triggered using these methods are run in the cloud by default, this means that you are unable to use steps that require the desktop application, such as the Download a file step.
We have a guide available for running your automations that are triggered by an integration or the API on your local computer, see How to trigger a desktop run using webhooks for more details. Your computer will need to be turned on and your browser will need to be open for the automations to run. This is ideal for running your axiom.ai instance on a server.
When running your automations unattended, we recommend setting up run notifications to be alerted if your automation has an error - this will ensure that you can step in and fix the issues with your automation. Notifications can be sent via email or they can trigger a webhook to be consumed by another service. See Learn how to set up notifications to learn more.
Additional reading
Want to dive into more content? Check out our guides below.
- Integrations: /docs/no-code-tool/integrations/
- API/third-party service guides: /guides/