How to automate Slack with axiom.ai
Slack Workflow Builder allows you to automate various actions within your Slack workflow. Using a webhook to trigger these workflows can enhance these workflows. Even better - you can pass data from your axiom.ai automation into your Slack workflow. Let's dive in.
Getting started
To get started, you'll need to have a Slack account that has access to Slack Workflow Builder. You'll also need to have the axiom.ai extension installed and be logged in.
Trigger a Slack workflow with an axiom.ai automation
Learn how to trigger a Slack workflow from an axiom.ai automation.
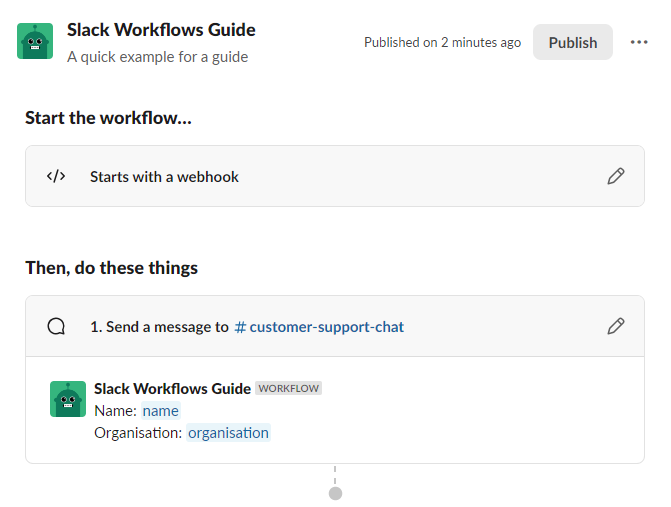
- Create Slack workflow: Head to the Slack app and open the Workflow Builder.
- Create workflow: Click "+ New workflow" to get started.
- Start the workflow: Click "Choose an event" to select a workflow trigger, select "From a webhook".
- Variables: To set up variables, click "Set up variables" – this is required to be able to send data to your workflow and allows the data to be used later.
- Add steps: Add steps that meet your requirements – you can use the variables above in certain steps by clicking "{} Insert a variable" in the step setup window.
- Save: Click "Finish up" to save your workflow, follow their steps and then click "Publish" to publish your workflow.
- Web request URL: After saving, re-open your workflow and click on the "Starts with a webhook" trigger, copy the "Web request URL" and save this for later use.
Now, let's head over to the axiom.ai extension. We are going to assume that you already have an automation created to capture the data that you wish to pass into your Slack workflow.
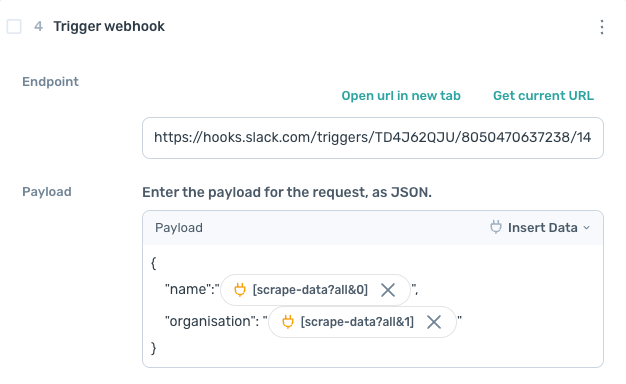
Trigger webhook: Add a Trigger webhook step to your automation.Endpoint: Paste the "Web request URL" you copied from Slack.Payload: Match the format shown in your Slack workflow.- To check the structure, open your workflow and click on "Starts with a webhook".
- Use the "Insert Data" option in Axiom to add tokens from your automation into the payload.
Triggering a Slack Workflow with Run Notifications
Setting up run notifications when an automation run completes can be a helpful way of keeping on top of your automations when they are running unattended. To do this, follow the instructions above to set up your Slack Workflow. The only change that is required is that your Slack Workflow has two variables set up as "text" variables: "status" and "log", see step 4 above for more details.
Then, head into your axiom.ai automation and follow the steps below:
- Open your automation: Open the Axiom automation you want to configure.
- Go to settings: Navigate to Settings → Set up notifications.
- Enable notification types: Toggle on the options you'd like to be notified of — when a run fails, when it succeeds with warnings, or when it fully succeeds.
- Enable webhook notifications: Turn on Notify by webhook.
- Enter webhook URL: Paste the Web request URL from the Slack workflow setup.
Tip: Using the Add error metadata step before a step allows you to add metadata to the error message produced by that step. This metadata will appear in the "log" that is sent if the automation fails - adding more context to your error messages. For more tips on debugging, see How to debug.
To pass custom data to your Slack Workflow, we would still recommend using the Trigger webhook step method described in the section above. These can be used together but we recommend referring to Slack's Rate Limit documentation for their API rate limits.
To learn more about Run Notifications, see the Run Notifications documentation.
Testing your workflow
Ensure that your workflow has been published and then hit "Run" in your axiom.ai automation. If there are error messages, review these error messages for next steps. Contact us if you are unsure of the errors that you are experiencing.
If successful, your workflow steps will be performed. For example, if this is set to send a message in a channel, check the channel that you have set within the workflow.
Examples
Let's dive into some example use cases.
Automate the creation of a daily spreadsheet
Automating the creation of a new spreadsheet on a daily basis and sending this to your team can be a useful way of tracking information within your teams. To get started, create a new Slack workflow:
- Create Slack workflow: Head to the Slack app and open the Workflow Builder.
- Create workflow: Click "+ New workflow" to get started.
- Start the workflow: Click "Choose an event" to select a workflow trigger, select "From a webhook".
- Variables: To set up variables, click "Set up variables" - add two "test" variables, one called "date" and another called "url".
- Add steps: Add a "Send a message to a channel" from the "Messages" section of the steps. Select the channel you wish to use in the "Select a channel" dropdown.
- Construct message: Create a message you'd like to send to the team, use the "{} Insert a variable" button to insert variables.
- Add a button: Click "+ Add button", add a "Button label", change the "Behaviour" to "Open Link" and use the "{}" button to input the "url". This will allow the spreadsheet to be opened with a click.
- Save: Click "Finish up" to save your workflow, follow their steps and then click "Publish" to publish your workflow.
- Web request URL: After saving, re-open your workflow and click on the "Starts with a webhook" trigger, copy the "Web request URL" and save this for later use.
Now, open your axiom.ai extension and follow the steps below:
- Create a new automation: Open the extension and click "+ New Automation" to get started.
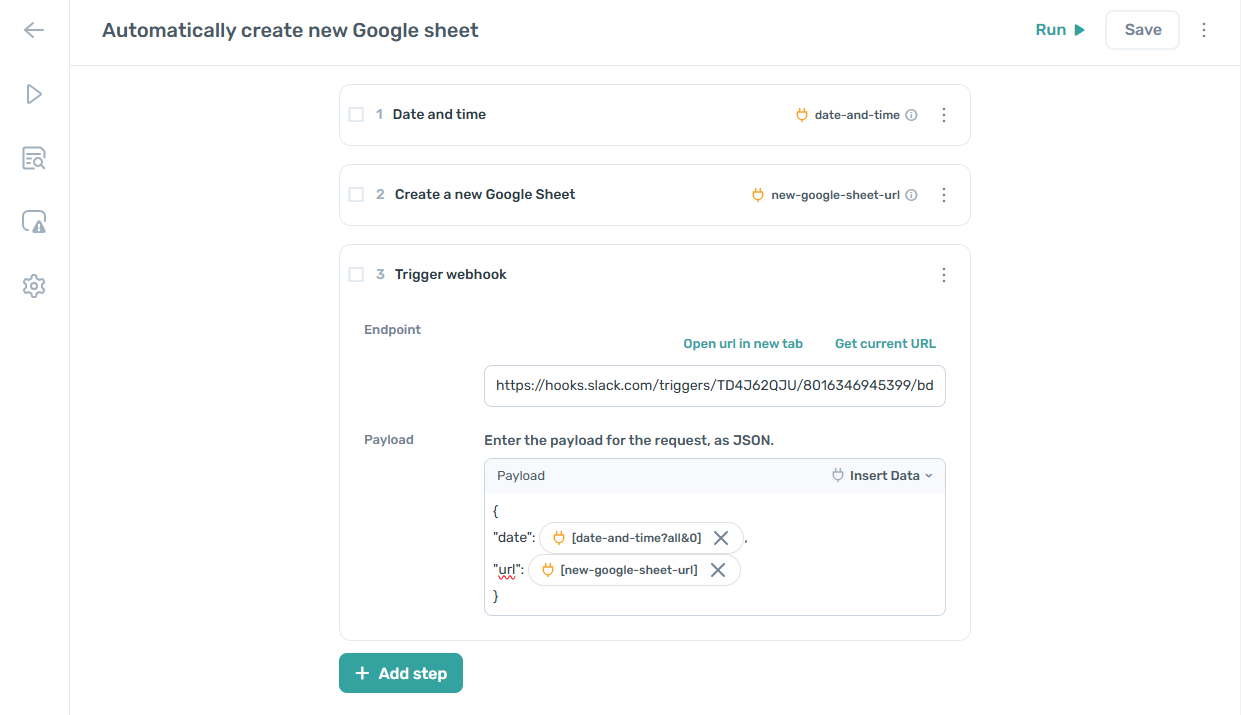
- Get date: To get the current date use the Date and time step. Select the format from in the step.
- Create Google Sheet: Use the Create a new Google Sheet step to create a new spreadsheet, use the output from the "Date and time" step to construct your "Sheet name".
- Trigger webhook: Add a Trigger webhook step to your automation, add the "Web request URL" from Slack to the "Endpoint" input.
- Payload: To construct the "Payload" in the "Trigger webhook" step, follow the format that is set out within the Slack workflow. Use the "Insert Data" option within Axiom to input data from your automation.
- Schedule: If your plan supports it, navigate to "Settings", then "Schedule" to set up a schedule to run daily, or more frequently.
Wrapping up
Automating the triggering of Slack workflows from axiom.ai allows you to send data to your Slack workflows. This can offer a wide range of automation opportunities, from automatically generating Google Sheets to notifying your team of data that has been scraped from a website, there are many options that you can use.