How to automate facebook posts
Using Facebook is a crucial day-to-day business activity for many of us, but creating posts across multiple accounts, whether for your own businesses or for clients, can be time consuming. 🤖 Bots are incredibly helpful in freeing up time and saving us from the tedious and repetitive tasks we tend to encounter while using a browser.

In this guide, we show you how to build a bot that can automate your Facebook posts directly in the browser. The design pattern you will learn can be applied to post from a profile. It can also be used to automate posts directly from Facebook Business pages. Get ready to dive in and discover the joy of using bots!
What exactly is a Facebook bot?
It’s like having your own digital assistant that you can delegate your Facebook tasks to. axiom.ai’s bots are highly customizable, and you can use them to automate almost anything in the browser, without having to use code. The beauty of learning to create bots is that they can be tailored to your specific requirements by mimicking your actions.
How does a Facebook bot work?
Facebook bots run in your Chrome browser and are built to mimic your actions, from logging into the app, clicking the menu button, and posting. Once the post form is open, your bot can populate it from files and text stored on your computer or in a Google Sheet.
Let’s learn how to build a bot to automate Facebook posts
With axiom.ai's no-code bot builder, you can create bots for posting on Facebook without having to code. Instead, use a simple point-and-click interface to create as many Facebook bots as you want. By following the steps below, you'll have a working bot automating your posts in no time.
The steps below outline how to use Google Sheets to store your posts, pass the data into your bot, and automate posting in the browser. The bot will click the “What’s on your mind” input field to open the post web form. You can also adapt what you learn here to post from Facebook Business pages.
If you're eager to start, why not give this template. a try?
1. Set up your Google Sheet
Create a new Google Sheet. You can do this in your Chrome browser by entering 'sheet.new' into the address bar. Don’t forget to name your sheet something like 'Facebook Posts’. In the sheet, add some text data, with the text in one column and paths to your post images in another.
2. Add first step
To build your bot from scratch, click on 'Add first step’. This will open the step selector and you can start adding steps to your bot.

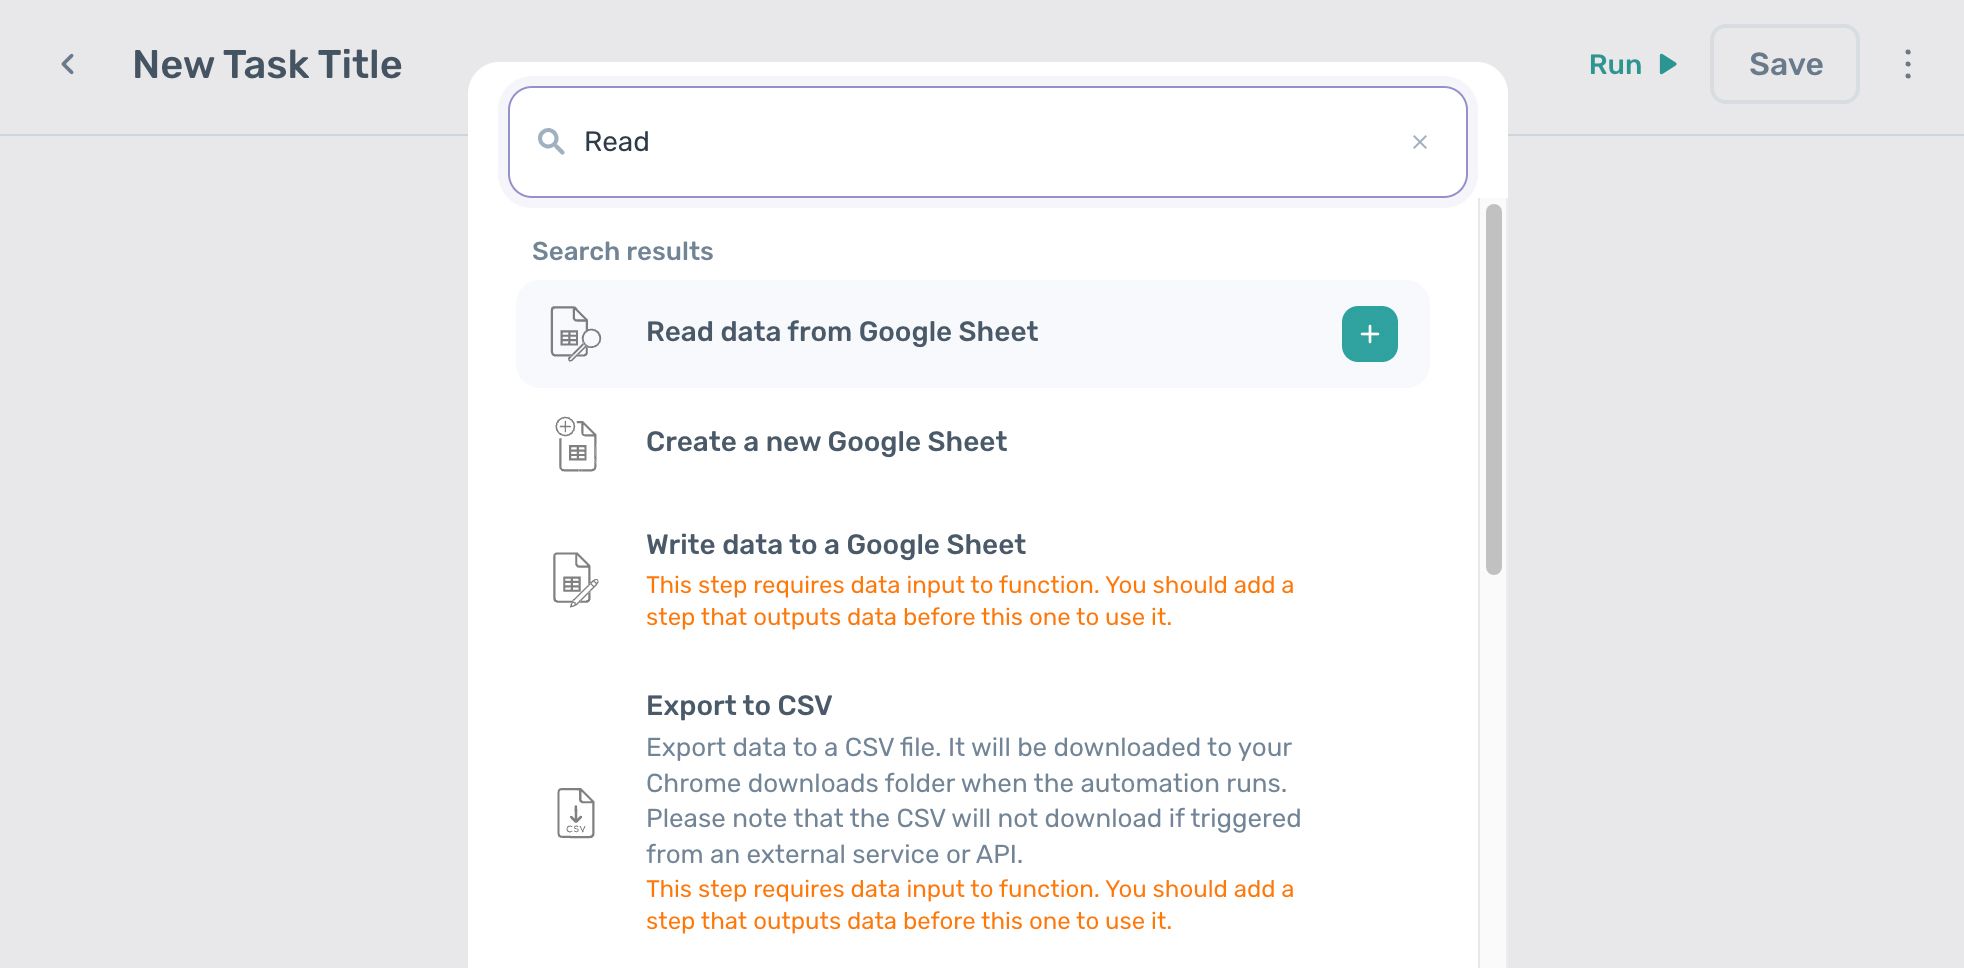
3. Add the step: ‘Read data from a Google Sheet’
Use the Step Finder to search for ‘Read data from a Google Sheet’ and click on it. The step will be added to Axiom for you to configure.
In the field called 'Spreadsheet URL', you can search for and upload the Google Sheet you are using as your data source, by name. Once found, click on it to select.
For 'Sheet name' click on the drop-down and select the correct tab.
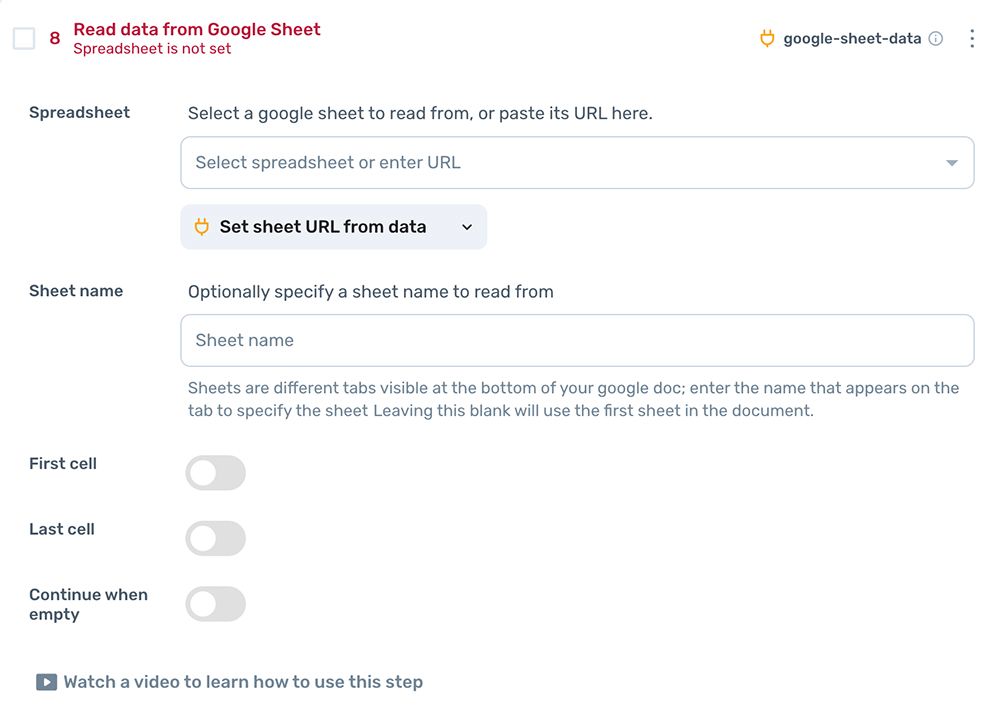
In the 'First cell' field, toggle the switch and enter 'A1’. This setting tells the bot where to start reading data.
In the 'Last cell' field, click the toggle switch and enter 'A1'. You have limited the bot to read ten rows. This is fine for now, you can increase the amount later once you’ve tested it.
If you want to learn more about Google Sheet steps, watch these videos.
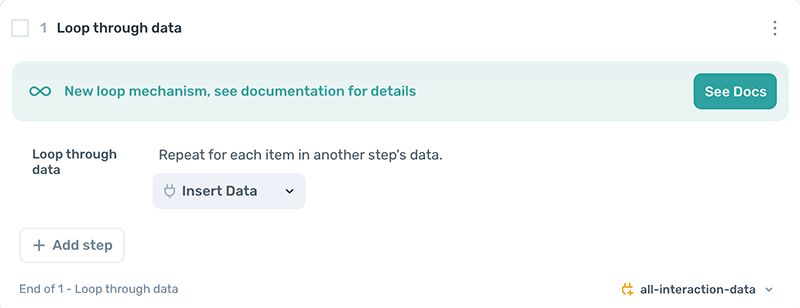
4. Add the ‘Loop through data’ step
Next, add a new step by entering ‘Loop through data’ into the Step Finder, and adding it. This step will allow your bot to loop through the rows of data stored in the Google Sheet.
5. Add the ‘Go to page’ sub step
Staying within the ‘Loop through data’ step, it’s time to add a sub step (click the white ‘Add step’ button).
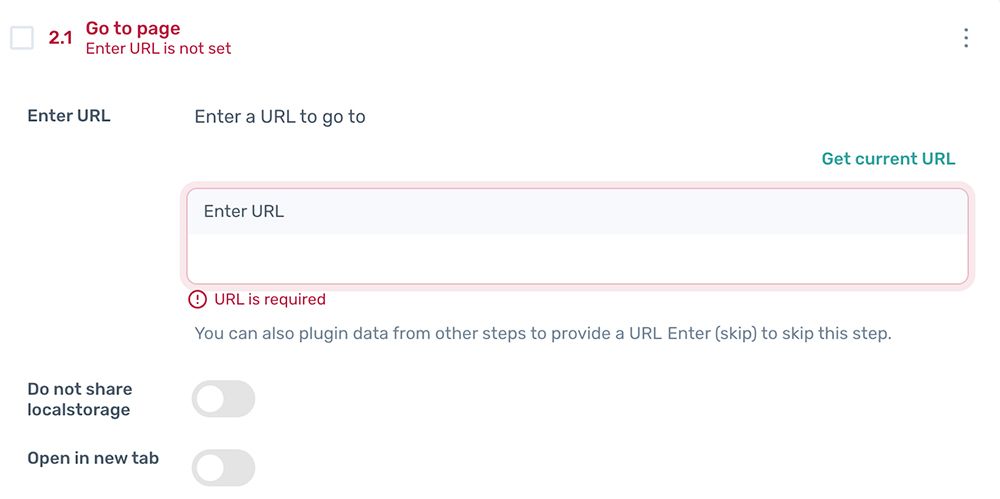
Use the Step Finder to search for ‘Go to page’ and click on it. The step will be added for you to configure.
In the 'Enter URL' field, cut and paste the Facebook URL. This step will open Facebook.
5. Add a ‘Click element’ sub step
Continuing within the same step, add a further sub step. Use the Step Finder to search for ‘Click element’ and click on it.
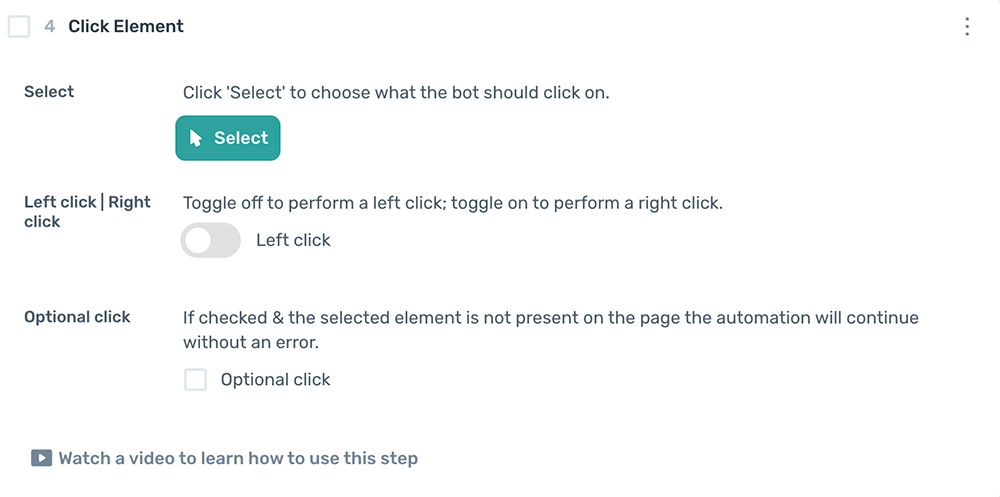
Next, click ‘Select’ and choose the “What’s on your mind” input field.
This click opens the post form.
6. Add an ‘Enter text’ sub step
Add a further sub step by using the Step Finder to search for ‘Enter text’ and clicking on it.
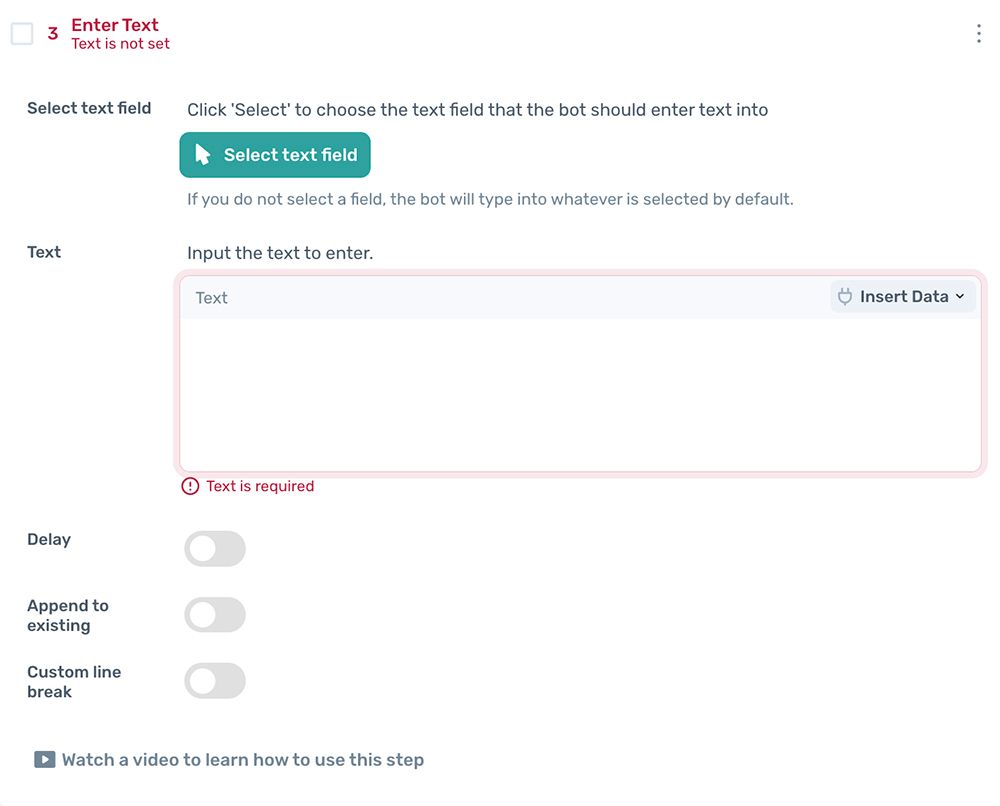
Next, click ‘Select’ to highlight the “What's on your mind” text and click confirm.
Then click ‘Insert data’ to select the Google Sheet used to store your posts, then highlight the column with the text for the post.
7. Add ‘Click element’ sub step
Add a further sub step by using the Step Finder to search for ‘Click element’ and clicking on it.
Then click ‘Select’ and choose the icon for uploading images: the green picture icon.
8. Add ‘Upload a file’ sub step
Add a further sub step by using the Step Finder to search for the ‘Upload a file’ step and clicking on it.
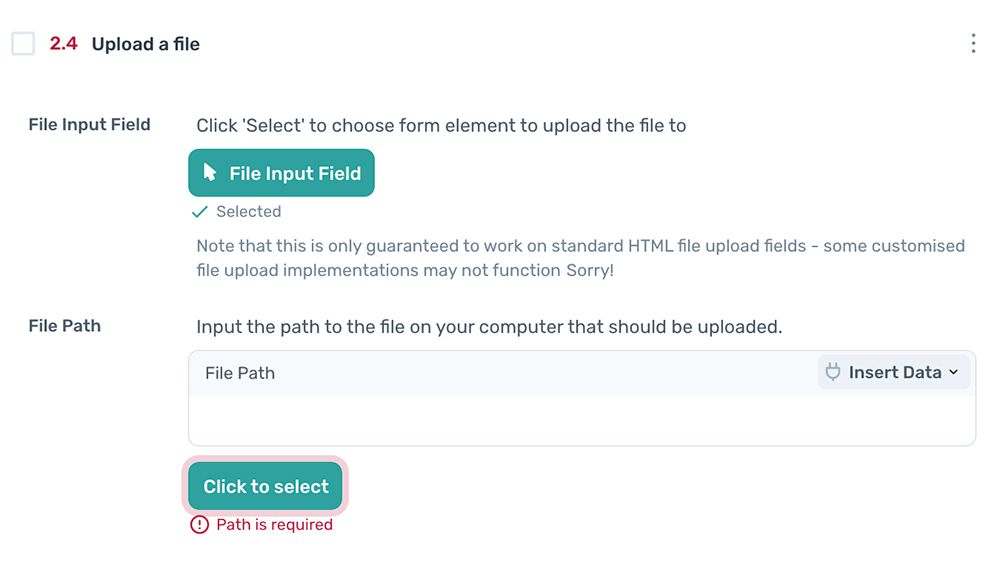
Next, select the grey ‘Add photos/videos’ area pictured below.
Then, in ‘File path’, click ‘Insert data’ and select the column in your Google Sheet with the file path.
Next, in ‘Click element’, click ‘Select’ and choose the icon for uploading images: the green picture icon.
9. Add ‘Click element’ sub step to click on Post
Add a further sub step by using the Step Finder to search for ‘Click element’ and clicking on it.
Select and highlight the blue ‘Post’ button in Facebook. Click ‘Confirm’ and hey presto, you have built your Facebook bot.
10 Finally, Add the ‘Delete rows from a Google Sheet’ sub step
Add a further sub step, 'Delete rows from a Google Sheet', to delete the row of data just entered. This is to prevent the same row from being entered repeatedly. Search for the step using the Step Finder, and add it.

Next, in ‘Spreadsheet URL’, upload the Google Sheet you are using as your data source.
For 'Sheet name' click on the drop-down and select the correct tab.
Then, in 'First row to delete' enter the number 1 and repeat this in 'Last row to delete', so that both are set to 1.
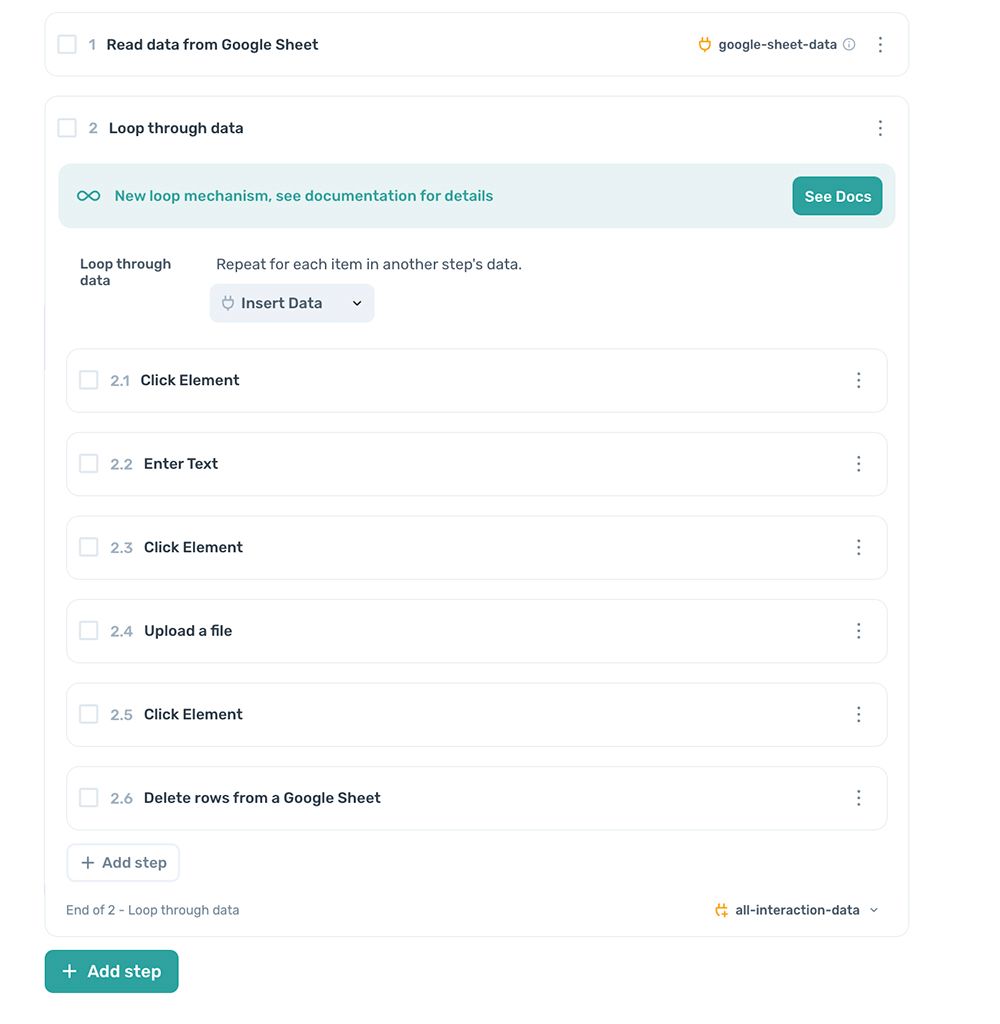
11. Ready to test
And that’s it! Your bot should look something like the below.
Before you test, we recommend disabling the last ‘Click Element’ step added, allowing you to test without actually posting.
When you’re ready to test, use the desktop app, by clicking ‘Run with desktop app’.
12. Running the bot
You can run the bot in the cloud and the desktop app. If you want to learn more about scheduling, see here.
Please note that if you build a bot on the desktop app when logged in, your session will be shared. However if you run the bot in the cloud, the session will not be shared. Learn how to work around this here.
Issues you may encounter with your Facebook bot
- The file isn’t uploading? Try reselecting the upload file element in step 8.
- The file is uploading, but the bot clicks post before it's finished? You may want to use ‘Wait’ steps to ensure the automation is in sync with the page.
- The post button isn’t clicking? Try using the text selector.
Don't forget we offer excellent customer support. If you need help, get in touch. (/customer-support)
Conclusion
🥳 Congratulations, you've learned how to make and use a bot to extract reports! With this newly acquired skill 👩🎓, you know how to automate scraping data, downloading files and sending emails. The sky's the limit with your new AI 🦸 super powers.
What else can I automate with Axiom?
If you're excited, here are some ideas for other bots: extract data from your email app (such as Gmail), generate content, and send direct messages on Instagram. We have steps to extract data with AI and to generate text with AI. Take a look at our templates here.