Automate Gmail login with 2FA for cloud runs
To automate a Gmail login with 2FA, store the Google account's login and its authenticator key as a credential, in your own 1Password vault or in axiom.ai, then sign in with Log in with credentials and type the 6-digit code from Generate authenticator code. Google asks for the code whenever you sign in from a new browser, and a cloud run is a new browser every time, so these steps let a Gmail automation such as a mail merge or an inbox clean-up run unattended in the cloud. Store Cookie keeps the signed-in session, so later runs skip the prompt.
Four parts: get the authenticator key from Google, store the login in 1Password or in axiom.ai (one or the other), then build the login steps. The login steps are one example of Google's sign-in, which changes with the browser and with whether a Google account is synced to it, so expect to adapt them: run each step as you add it, look at the screen Google shows, and give it the step it needs. Why your login steps may differ says how.
Get the authenticator key from Google
The key is the secret an authenticator app holds for the account. axiom.ai, or 1Password, generates the same codes from it at run time.
- In Gmail, click the apps grid at the top right and choose Account, or go to myaccount.google.com, and open Security & sign-in.
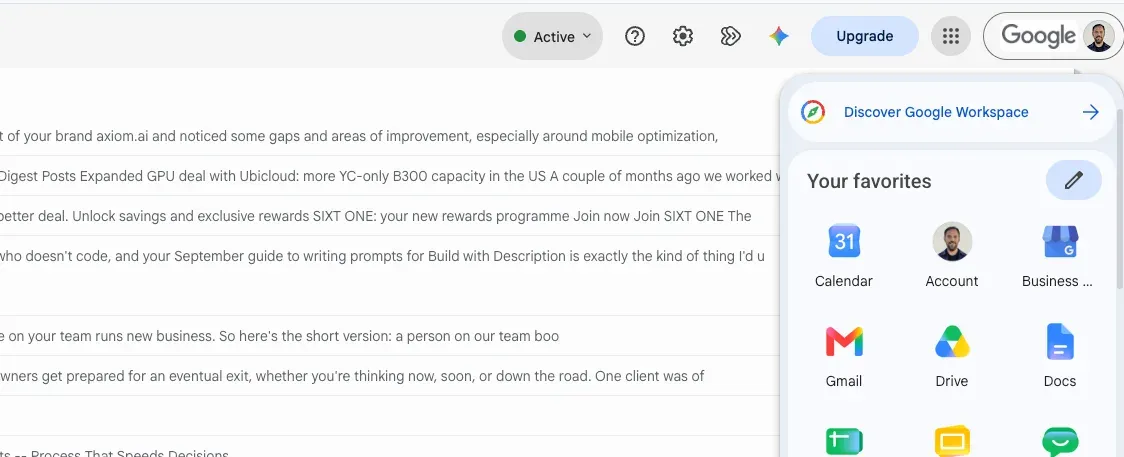
- Under How you sign in to Google, turn on 2-Step Verification if it is off. Google asks for a phone number to start; you remove it as the second step in step 6.
- On the same page, click Authenticator, then Set up authenticator. Google shows a QR code.

- Click Can't scan it? and copy the key Google shows. Copy it now, before you verify a code: asking for it again later issues a fresh key that no longer matches.
- Leave this page open, store the key with the login in 1Password or axiom.ai (the next two parts), then come back, click Next, enter a code generated from the key and click Verify. 1Password's one-time password field shows one; otherwise add the same key to an authenticator app on your phone and read the code there.
- Back on Security & sign-in, make the authenticator the only second step: open Google prompt and remove the device, and turn off Skip password when possible. Google then goes straight to the code box after the password.
Store the login and 2FA key in 1Password
The username, password and key stay in your vault. axiom.ai holds only a reference to the item and a token that can read the vault, and fetches the values at run time. Skip this part if you would rather store the login in axiom.ai.
- In 1Password, create a vault for the logins you automate, for example axiom.ai. Service accounts cannot read a personal vault, so the item has to be in a vault of its own.
- Add a Login item to it with the Gmail address as the username and the account password.
- Add a One-Time Password field to the item and paste the key from Google into it. The item now shows the current 6-digit code, which you can use to finish Google's setup.
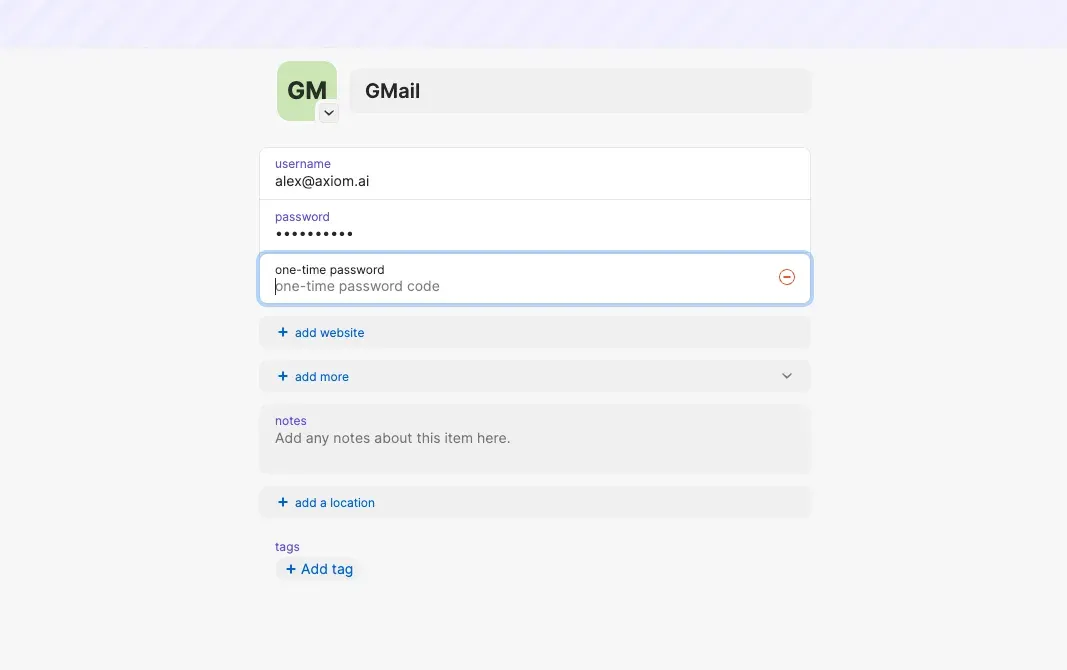
- Create a service account token: click your profile, then Manage Accounts, then Developer. On the Directory tab, under Access Tokens, click Service Account, name it, tick the vault you created, and click Create account. Copy the token; 1Password shows it once.
- In axiom.ai, open Login credentials from the dashboard sidebar, click Add credentials and choose the 1Password provider.
- Give it a
Label, such as Gmail automation, setItem referenceto the item'sop://vault-name/item-nameandService account tokento the token, and click Save credentials.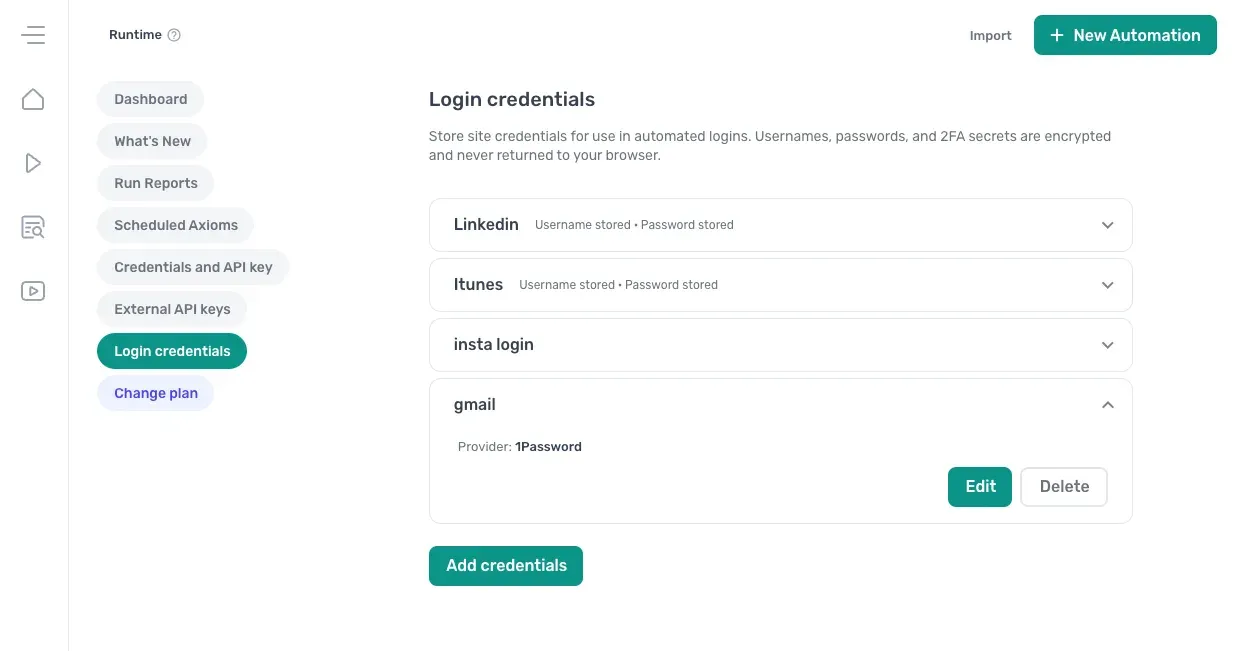
The 1Password integration page has screenshots of each 1Password screen.
Store the login and 2FA key in axiom.ai
The username, password and key are encrypted and kept in axiom.ai, and decrypted only when a run signs in. Skip this part if you stored the login in 1Password.
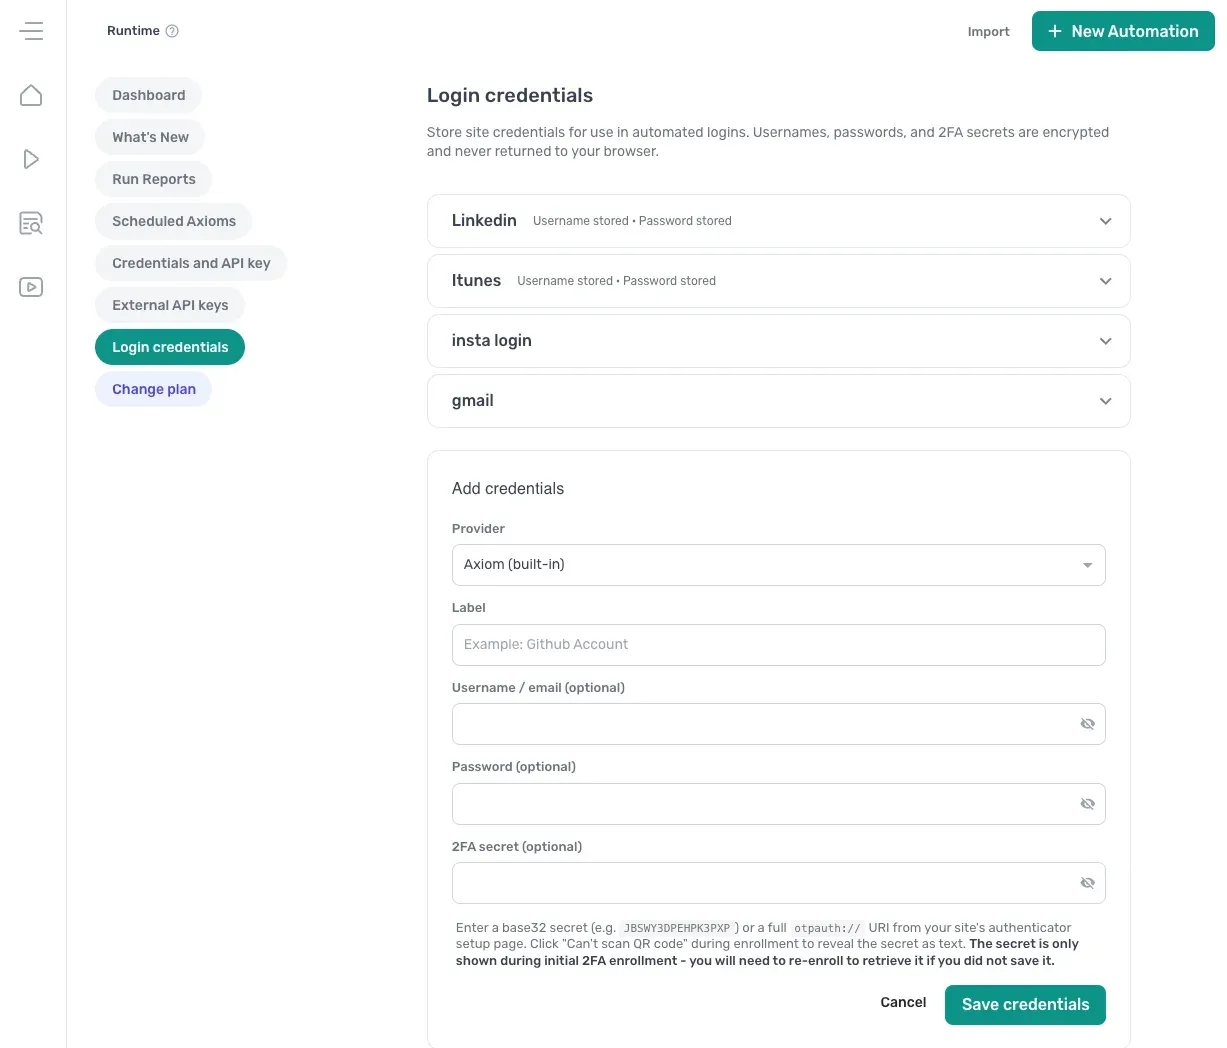
- Open Login credentials from the dashboard sidebar and click Add credentials. Leave
Provideron Axiom (built-in). - Give it a
Label, such as Gmail automation, and fill inUsername / emailwith the Gmail address andPasswordwith the account password. - Paste the key from Google into
2FA secret. It is shown only while you add the credential, so keep a copy if you want it again. - Click Save credentials.
Both providers are covered in Log in with saved credentials.
Build the login steps in axiom.ai
Add the steps in this order in the step-by-step builder. The steps are the same whichever provider holds the credential. In this example the browser already knew the account, so Google listed it on Choose an account and asked for the password only. Google's sign-in varies with the browser and the account, and its selectors need care, so the steps may not match yours exactly: see why your login steps may differ below.
- 1.0
Go to page - 2.0
Click elementSelect: the first account on the Choose an account screen, custom selectordiv[role="link"][data-authuser="-1"]Optional click: on, as Google shows this screen only when the browser already knows the account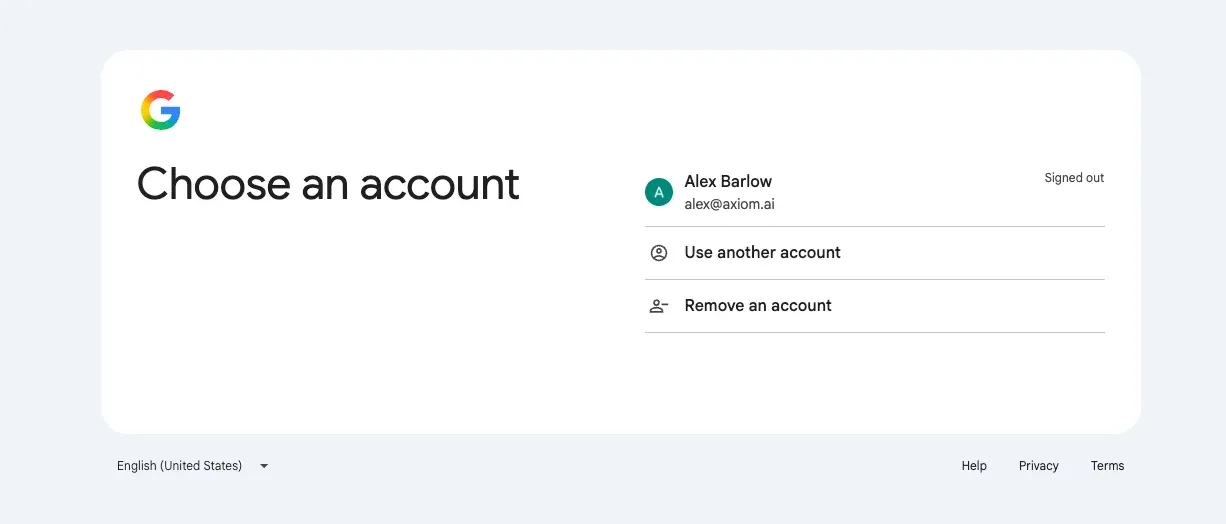
- 3.0
Log in with credentialsCredentials: your saved Gmail credentialUsername field: empty, the account is already chosenPassword field: the Enter your password box, custom selectorinput[name="Passwd"]
- 4.0
Click elementSelect: the Next buttonClick: Custom with Use element text instead of HTML on
- 5.0
Click elementSelect: the Try another way link, selected by its text, on the screen that sends a prompt to your phoneClick: Custom with Use element text instead of HTML onOptional click: on, as Google shows this screen only when the account has a phone prompt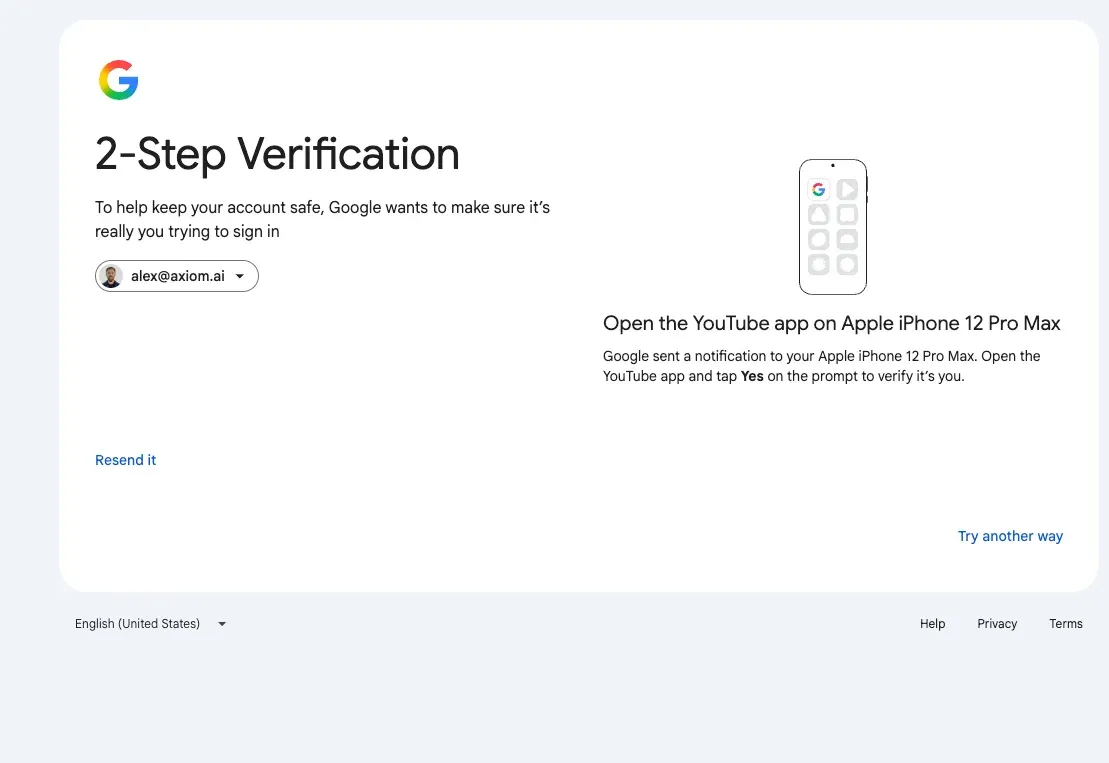
- 6.0
Click elementSelect: Get a verification code from the Google Authenticator app, on the screen that asks how you want to sign in, custom selector[data-action="selectchallenge"][data-challengeid="2"]Optional click: on, as Google skips this screen when the authenticator is the only second step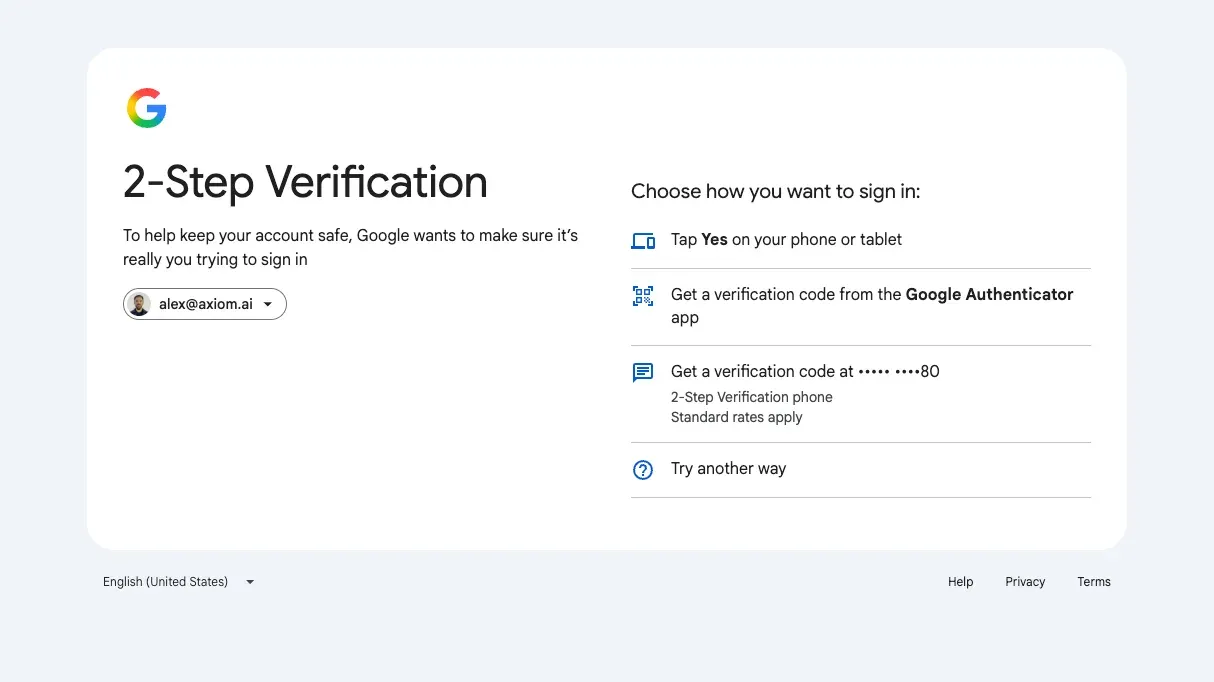
- 7.0
Generate authenticator codeCredentials: the same credential, which gives the code as[totp-code]
- 8.0
Enter textSelect text field: the Enter code box, custom selectorinput[name="totpPin"]Text:[totp-code]
- 9.0
Click elementSelect: the Next buttonClick: Custom with Use element text instead of HTML on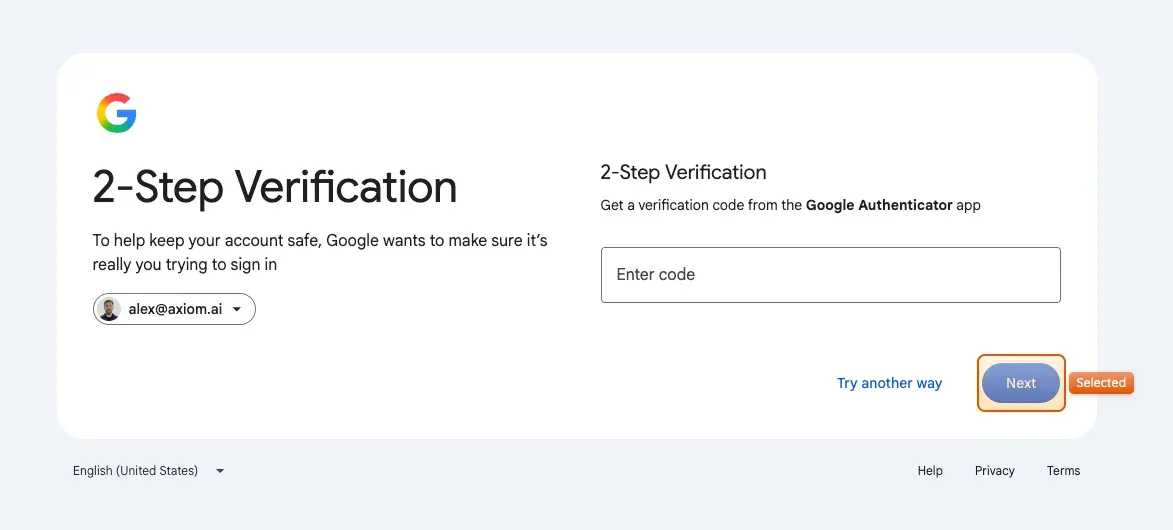
- 10.0
WaitWait time: 5000
- 11.0
Click elementSelect: Use Chrome without an account, on the Sign in to Chrome? dialog that covers the inboxClick: Custom with Use element text instead of HTML onOptional click: on, as the stored session skips the dialog on later runs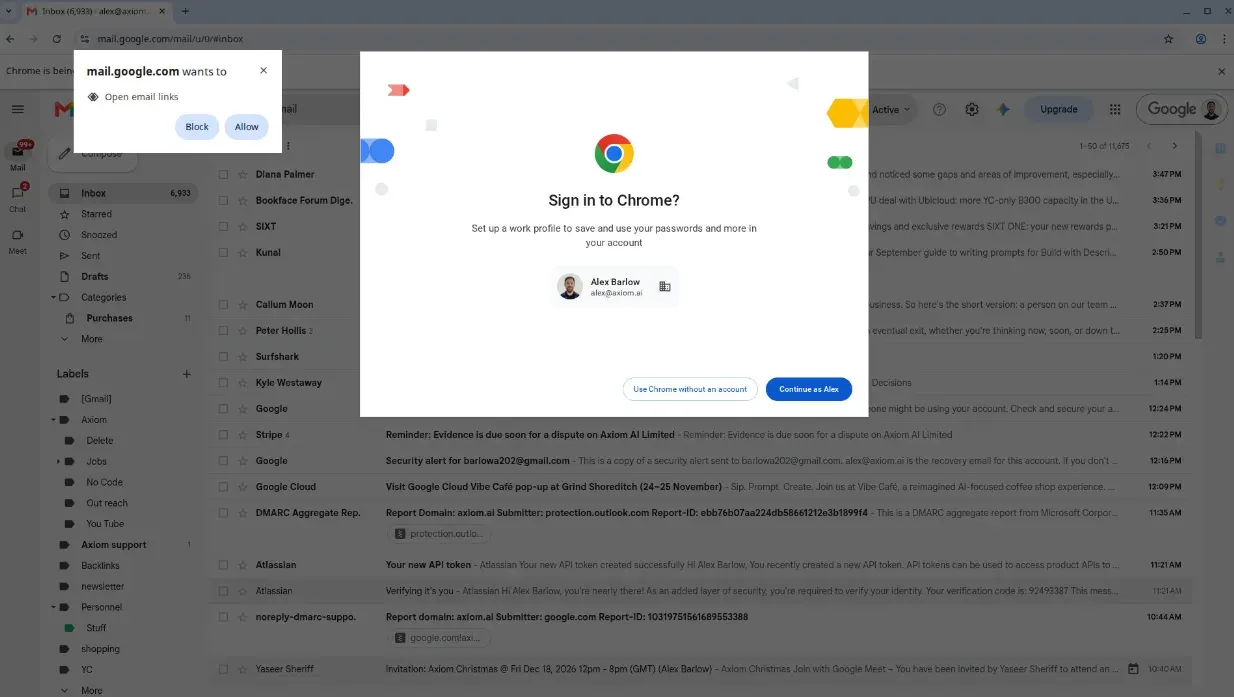
- 12.0
Click elementSelect: the Not now button on the prompt to add a recovery phone or simplify sign-inClick: Custom with Use element text instead of HTML onOptional click: on
Step 11.0 dismisses the dialog the cloud browser shows once the inbox opens, offering to sign the browser itself in to your Google account. Choose the option without an account: the browser is a private container destroyed when the run ends, so signing it in gains nothing. The small mail.google.com wants to open email links prompt at the top of the window is Chrome's own and does not block the page, so leave it.
Then add the steps of the Gmail automation itself and run it once in the cloud. It signs in, types the code and lands in the inbox on its own.
Why your login steps may differ
Google's sign-in screens vary with the browser and with whether a Google account is synced to it, so the login steps may differ from the ones above. When this guide was built the browser was synced to the account, so Google opened on Choose an account with the email already listed, and a click on the account by its text replaced the email step. In a fresh cloud browser Google asks for the email first. Build the login one step at a time, running each step and reading the screen Google shows next: an email or password box takes a Log in with credentials step with only that field selected, and a button or an account takes a Click element by its text. If the email and the password are on separate screens, use two Log in with credentials steps, one for each, with a Next click between them. This guide is one example of the sign-in, not the only shape it takes.
Google's sign-in pages also make elements hard to select. The classes and ids are generated and change on every page load, so a selector built from them works once and never again, and elements load in and are removed as the page settles, so a selector that counts position in the page shifts too. Select by text and by attributes instead: the buttons by their text with Use element text instead of HTML, and the boxes by a custom CSS selector on an attribute that describes the field, as given under the steps above. These worked when this guide was written and Google may change them.
Common questions about automating Gmail login with 2FA
Which should I use, 1Password or axiom.ai?
1Password if you already use it: the password and key never leave your vault, you rotate them there, and the same item serves your team. axiom.ai if you do not: it is quicker to set up and needs no other account. The login steps are identical, so you can move from one to the other by saving a new credential and picking it in the two steps.
Google asks me to check my phone, not for a code. What do I change?
Google goes to the second step it thinks easiest, a prompt on your phone when the account has one, and lists the others behind Try another way. Steps 5.0 and 6.0 handle that: the first opens the list, the second picks the authenticator. Both are optional clicks, so when Google asks for the code at once they are skipped. Making the authenticator the only second step, as in step 6 of the Google part, removes the two screens altogether.
Why do my selectors on Google's sign-in page stop working?
Google generates its class names and ids and changes them on every page load, so a selector made from them matches once and never again. Position is unreliable too: elements load in and are removed as each screen settles, so "the second input on the page" is not the same input a moment later. Select by what does not change: the button text, with Use element text instead of HTML, and attributes that describe the field, such as input[type="email"], input[name="Passwd"] and input[name="totpPin"], entered as custom CSS selectors. The selectors in this guide worked when it was written; if Google changes them, open the step, pick the element again and check what the selector tool chose, or hand the failed run to the agent. Attribute selectors explains the pattern.
Google asks for my email first. What do I add?
A browser that does not know the account gets an email box before the password. Add a Log in with credentials step before step 3.0 with only Username field set, to the Email or phone box, custom selector input[type="email"], then a Click element on Next and a short Wait. One Log in with credentials step cannot fill both screens, so each screen gets its own, with the other field left empty.
Do I need the code on every run?
Not once the first run has signed in. With Store Cookie on the Go to page step, the signed-in Google session is kept and reused by later cloud runs, so they skip the password and the code until Google expires the session. The 2FA steps stay in place for when it does. See storing cookies.
What happens to my Gmail session when the run ends?
It is gone with the browser. A cloud run happens in a private Docker container made for that run alone, and the container and everything in it, the browser, its cookies and the open inbox, are destroyed when the run finishes. No other user and no later run of anyone else's can reach it. The one thing kept is what Store Cookie saves: the signed-in cookies, encrypted and attached to your automation, so your own next run can skip the login. On the desktop app the run uses your own Chrome and leaves it as it found it.
Google says this browser or app may not be secure. What now?
Google sometimes refuses a sign-in it judges automated. Run the automation once on the desktop app with Store Cookie on, so the session is created in a browser Google trusts and then carried into cloud runs. If it keeps happening in the cloud, turn on Bypass bot detection.
Will this work with codes sent by SMS or email?
No. These steps generate authenticator codes only. For a code Google texts or emails, use the Wait for 2FA code step and deliver the code to the run through the API; see Log in with 2FA. The authenticator route is simpler, because nothing has to be forwarded.
Can the agent build this for me?
Yes, once the credential exists. Click Build from description in the extension, say "sign in to Gmail with my saved Gmail credential and type the authenticator code", and the agent builds and tests the steps above. It cannot set up Google's authenticator or save the credential, which is why this guide walks through those by hand.
Where do I get help?
Get in touch with support, or ask in the axiom.ai community.
Related guides
Automate Instagram login with 2FA for cloud runs
- Open the Instagram login page
- Close the cookie window if it appears
- Sign in with my saved Instagram credential
- Type the authenticator code and confirm
- Dismiss the save login and notification prompts
Close cookie pop-ups and notification prompts automatically
- Open the site's login page
- If a cookie window appears, reject the cookies
- Carry on either way
- Then sign in with my saved login
Check if a website needs a login and log in only when it does
- Go to the site I give you
- Check if it is showing a login page
- If it is, log in with my email and password
- Then carry on with the rest of the task