How to trigger a desktop run from Zapier and post data back
A webhook can trigger a run on your own desktop, not just on axiom.ai's cloud. Send the webhook to the /desktop-trigger endpoint and the run starts in the axiom.ai desktop app on your own network, so your data stays on hardware you control while you keep the power of axiom.ai behind it.
This guide shows you how to trigger a desktop run from Zapier and send the data back, building a simple web scraper as the example. What you learn here adapts to any automation you already have.
Getting started
You need:
- A Pro tier subscription or above.
- The axiom.ai desktop app installed, running, and logged into the same account.
- Your API key, found in the Dashboard. See Authentication.
- The exact name of the automation you want to run. It's case-sensitive and whitespace-sensitive.
- A Zapier account.
Note: The desktop trigger doesn't accept input data. The
dataarray supported by the cloud trigger endpoint isn't available here, so the automation holds its own target URL.
Step 1: Turn on desktop routing for the automation
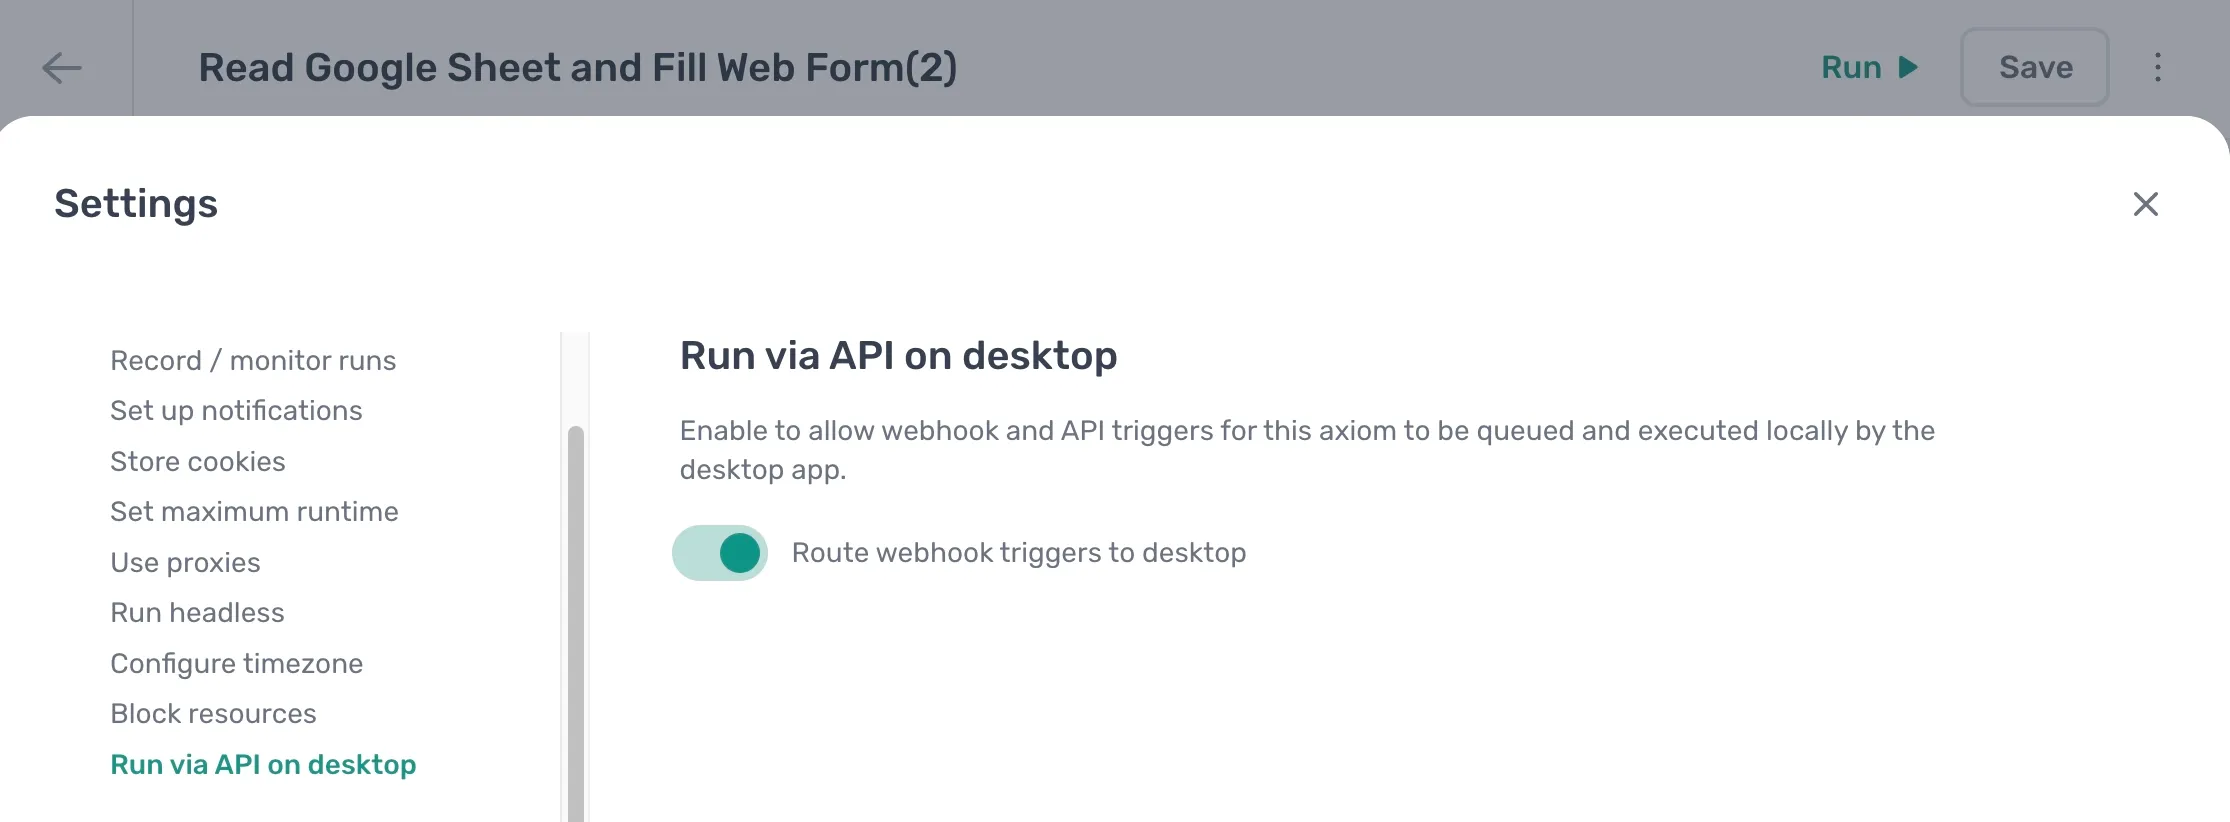
- Open the automation and click the Cog icon in the toolbar on the left.
- Open the Run via API on desktop section under Run options.
- Toggle Route webhook triggers to desktop on.
Until this is on, the endpoint rejects the call with
Desktop webhook not enabled for this task. See Automation settings for the rest of the run options.
Step 2: Trigger the run from Zapier
This Zap queues the run on your desktop. Its trigger can be anything: a new row in a sheet, a schedule, a form submission.
- In Zapier, click + Create and pick whichever trigger suits the job.
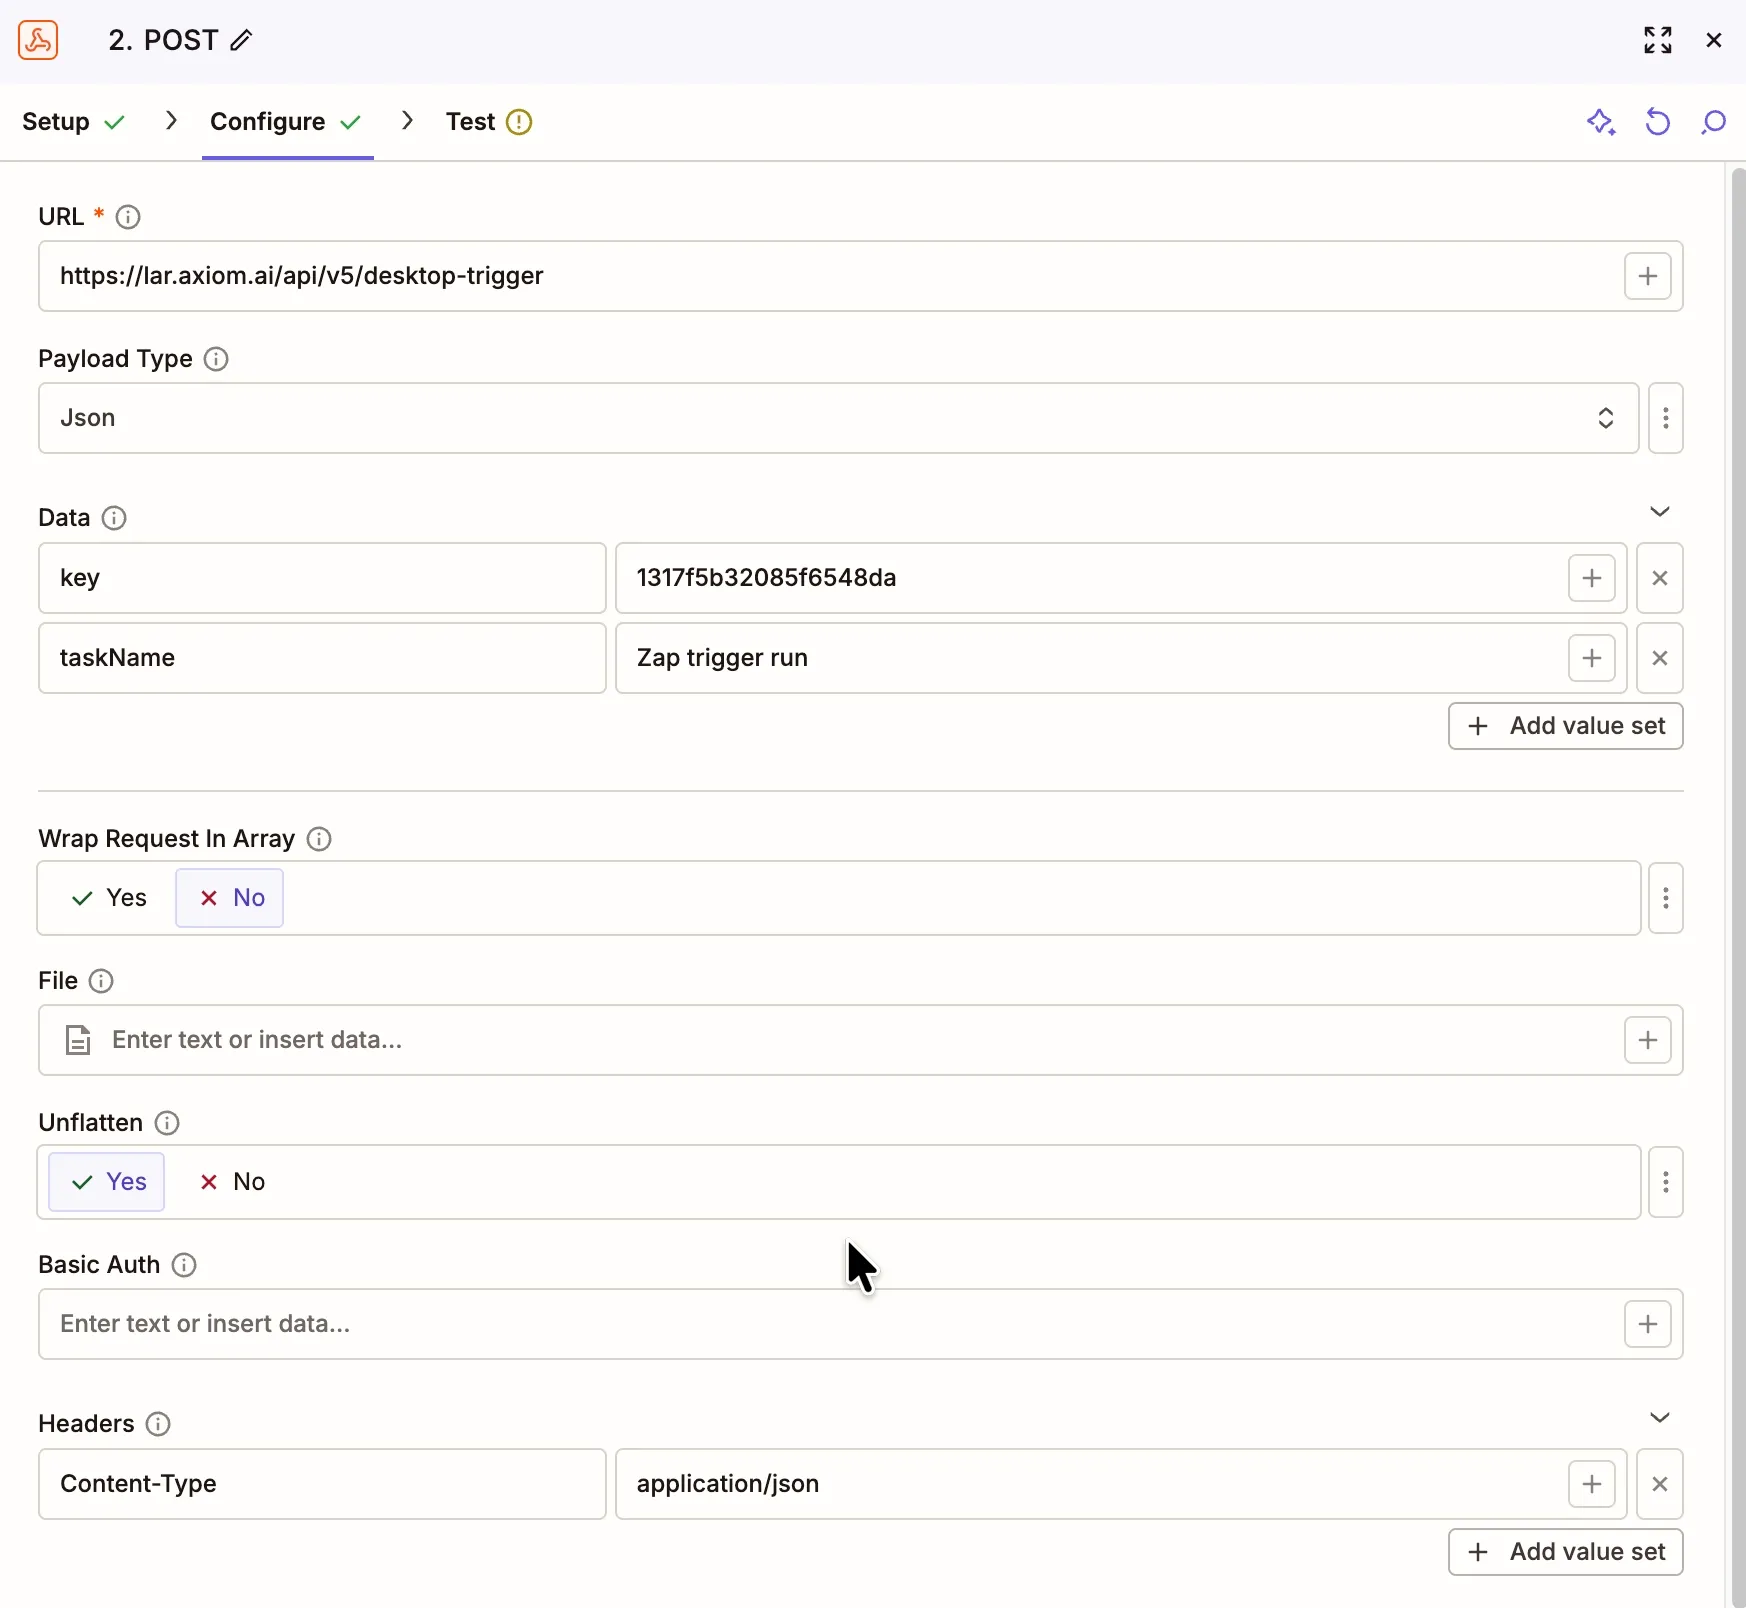
- Add an action, search for Webhooks by Zapier, and set the action event to POST.
- Set URL to
https://lar.axiom.ai/api/v5/desktop-trigger. - Set Payload Type to Json.
- In Data, fill the first row: name
key, value your API key. - Click Add value set and fill the second row: name
taskName, value the exact name of your automation. - Leave Wrap Request In Array as No and Unflatten as Yes.
- Click Continue.
Note: Data takes a name in the left box and a value in the right box, one pair per row. Don't paste raw JSON into it. Payload Type: Json builds the body and sets the content type for you, which is why the POST action is easier here than Custom Request.
Zapier sends this:
{
  "key": "your-api-key-here",
  "taskName": "My First Automation"
}
The same call in cURL, useful for checking the key and name before you put them in Zapier:
curl -s -X POST https://lar.axiom.ai/api/v5/desktop-trigger -H "Content-Type: application/json" -d '{"key":"your-api-key-here","taskName":"My First Automation"}'
A successful call returns a 202 and this body:
{
  "queued": true
}
Note: Queued means the desktop app has a run waiting, not that the run has started. If the app isn't running when the call lands, the run starts as soon as the app is next online, as long as that happens within 24 hours. After that the trigger expires.
Authentication on this endpoint is body-only. Send key in the JSON body. The X-API-KEY and Authorization: Bearer headers used elsewhere in the API don't work here.
Step 3: Build the scrape
- Add a Get data from a URL step and enter the page you want to scrape.
- Use the selector tool to pick the values you want. The step outputs them as the
[scrape-data]token. - Save the automation and run it once from the Builder to confirm the scrape returns what you expect. A single scrape keeps the example short, but the middle of this pattern is yours. Add or swap steps to fit the job:
- Add Go to page and Click element steps to reach a page that sits behind a menu or a search.
- Add a Loop through data step to work through a list of URLs instead of one page.
- Log in first if the page needs a session, which is one of the better reasons to run on your desktop at all. See Log in to sites.
- Add a Write data to a Google Sheet step if you want the data filed as well as posted back.
- Read a local file, or drive a locally installed app, since the run happens on your own machine. Only the last step matters to Zapier. Whatever you build, finish with the Trigger webhook step in step 4 and whatever token holds your data goes in the payload.
Step 4: Send the data back to Zapier
Create a second Zap to catch the results, then point the automation at it.
- In Zapier, click + Create and add a trigger.
- Search for Webhooks by Zapier and select it.
- Set the trigger event to Catch Raw Hook, then click Continue.
- Copy the URL in the Your webhook URL section. Back in the automation:
- Add a Trigger webhook step below the scrape.
- Paste the webhook URL into
Endpoint. - Click Insert Data in
Payloadand select the[scrape-data]token. axiom.ai builds the JSON payload for you and posts the data as a 2D array. - Save the automation.
Step 5: Test the loop
- Make sure the desktop app is running and logged in.
- Click Test step on the POST action in the first Zap. The response should be
{"queued": true}. - Watch the run start in the desktop app.
- Go back to the catching Zap and click Test trigger. Your scraped data appears as the raw body.
- Add a Formatter by Zapier step to split the raw body into fields, then send those fields wherever you want them. To configure Formatter by Zapier:
- Set the action event to Text.
- Set Transform to Split Text.
- Set Input to Raw Body.
- Set Separator to a single speech mark.
- Set Segment Index to All (as separate fields).
Troubleshooting
| Response | Cause |
|---|---|
Unable to authenticate, you must send an API key. | key is missing from the request body. |
Unable to authenticate, please check your API key and try again. | key doesn't match an active API key. Generate a new one in the Dashboard. |
Missing task name, you must send the name of the task that you wish to trigger. | taskName is missing from the request body. The cloud trigger endpoint calls this field name, so check you haven't carried that habit over. |
404, taskName not found | The name doesn't match an automation in your account. Copy it straight from the Dashboard, since a stray space or capital is enough to break it. |
Desktop webhook not enabled for this task | Step 1 hasn't been done for this automation. |
You must have a pro subscription or higher to use this API. | The account is below Pro tier. |
| An HTML page rather than JSON | You've hit a host that doesn't serve this endpoint. Check the URL. |
Unable to authenticate, you must send an API key. also shows up when the key is present but the body never arrives as JSON, so the server sees an empty request. If the key is definitely right, check Payload Type is set to Json and that key and taskName are separate rows in Data rather than raw JSON pasted into one box.
There's no endpoint for checking a desktop run's status from outside the desktop app. Check the run history in the Dashboard or in the desktop app itself. For the full endpoint reference, see Trigger a desktop run.
Wrapping up
Two Zaps and two steps give you a local scrape that any of Zapier's apps can start, with the results landing back in Zapier a few seconds later. The same pattern covers anything the cloud can't do for you: reading a local file, driving a des