Track progress when working through many rows in a Google Sheet
When an automation works through hundreds of rows from a Google Sheet, a run can stop part way: a page fails to load, the run times out, or you stop it. The next run then starts from row one and repeats rows that are already done. This guide marks each row as it is finished and skips the marked rows on the next run, so every run carries on from where the last one stopped.
It takes four steps and works with any loop over sheet data. Two worked examples are below: scraping a page per row and entering data into a web form.
How it works
When the automation finishes a row, it writes a marker word such as submitted or scraped into a spare column of that row. At the start of every run, rows that already have the marker are filtered out, so the loop only sees the rows still to do.
The four steps are:
- Enter custom data holds the marker word, so you set it once and reuse it.
- Remove results that contain certain words runs straight after the sheet is read, and drops the rows that already carry the marker.
- Find row in a Google Sheet runs at the end of each loop, and finds the row the loop is working on by a value that is unique to it, such as a URL or an email address.
- Write data to a Google Sheet writes the marker into that row.
Note: The marker goes in a column to the right of your data. If your data fills columns A to G, use column H. The automation never clears or moves your data, it only adds the marker.
Before you begin
- A Google Sheet with one row per item, with a header row, and one column holding a value that is unique to each row (a URL, an email address, an order number).
- A spare column to the right of the data for the marker. Leave it empty; you can give it a header such as
Status. - An automation that reads the sheet with Read data from a Google Sheet and loops over the rows with Loop through data.
Step 1: Store the marker word
- Add an Enter custom data step before the sheet is read, as the first step of the automation.
- In
Custom data, type the marker word on one line, for example submitted.
The step outputs the word as the [custom-data] token. The later steps use this token, so you change the word in one place.
Step 2: Skip the rows that are already done
- Add a Remove results that contain certain words step directly after Read data from a Google Sheet.
- In
Data, select the sheet data token,[google-sheet-data]. - In
Words (comma separated), insert the[custom-data]token instead of typing the word. - Leave
Word matching modeas it is.
The step outputs the rows that do not carry the marker as [word-removed-data]. Point Loop through data at this token rather than at the sheet data, so the loop only runs for the rows still to do.
Note: On the first run no row carries the marker, so every row goes through the loop. The filter only makes a difference from the second run on.
Step 3: Find the row the loop is on
- Add a Find row in a Google Sheet step as the second to last step inside the loop.
- In
Spreadsheet, select the same sheet the automation reads from. - In
Sheet name, select the same tab. - In
Values (comma separated), insert the loop's unique column, for example the URL column of the current row. - Turn on
Exact match, so a URL that is the start of another URL does not match the wrong row. - Turn on
Columns (optional)and enter the number of the unique column, counting from 1, so only that column is searched.
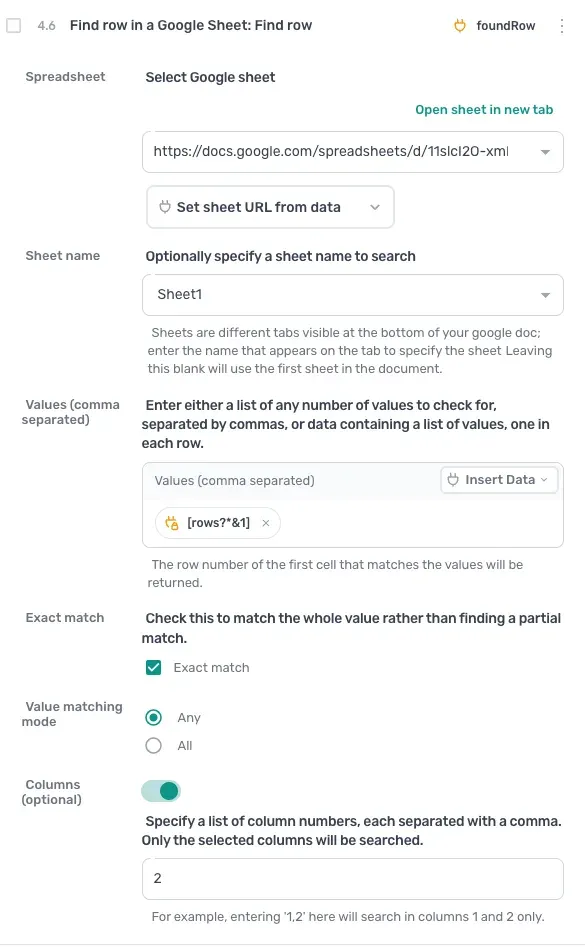
The step outputs the row number of the matching row as [find-row-google-sheet]. In the screenshot the step's output is renamed [foundRow] and the value comes from the loop's current row.
Step 4: Write the marker into that row
- Add a Write data to a Google Sheet step as the last step inside the loop.
- In
SpreadsheetandSheet name, select the same sheet and tab again. - In
DATA, insert the[custom-data]token. - In
Write options, choose Add to existing data. - In the starting cell field that appears, type the marker column's letter followed by the row token, for example
H[find-row-google-sheet].
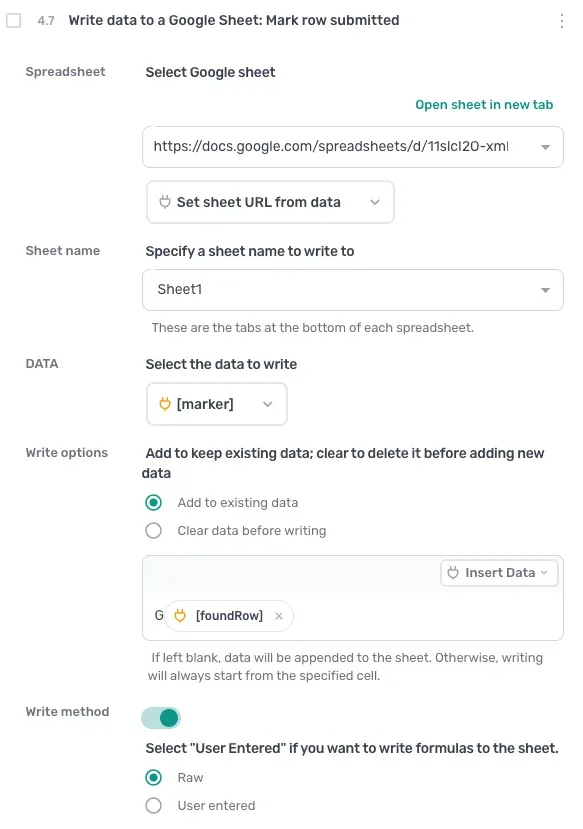
The marker lands in column H of the row the loop just finished. If the row is the 12th in the sheet, the token resolves to H12. The screenshot writes to column G, with the marker and row tokens renamed [marker] and [foundRow].
Note: Put these two steps last in the loop, after the work has succeeded. If the scrape or the form submission fails, the loop stops before the marker is written, and the row is tried again on the next run.
Example: scraping a page per row
A sheet has two tabs: Products, with a product URL in column A on each row, and Results, empty apart from a header row, where the scraped data goes. The automation scrapes each product page.
This example has two Write data to a Google Sheet steps, and they do different jobs. The first writes the scraped data to the Results tab, adding a row each time. The second writes the marker into the row on the Products tab that the loop has just worked through. Keep them apart: the scraped data never goes back onto the Products tab, and the marker never goes onto Results.
- 1.0
Enter custom data:Custom datais scraped. - 2.0
Read data from a Google Sheet: the product sheet, tabProducts. - 3.0
Remove results that contain certain words:Datais[google-sheet-data],Words (comma separated)is[custom-data]. - 4.0
Loop through data: loops over[word-removed-data]. - 4.1
Go to page: the URL column of the current row. - 4.2
Get data from bot's current page: the fields to scrape, output as[scrape-data]. - 4.3
Write data to a Google Sheet: (the scraped data): tabResults,DATAis[scrape-data], Add to existing data with the starting cell left blank, so each row is appended below the last. - 4.4
Find row in a Google Sheet: tabProducts,Values (comma separated)is the URL column of the current row,Exact matchon. - 4.5
Write data to a Google Sheet: (the marker): tabProducts,DATAis[custom-data], Add to existing data, starting cellB[find-row-google-sheet].
Stop the run after ten products and run it again. It skips the ten rows marked scraped and carries on with the eleventh. The Results tab grows without repeats.
Example: entering data into a web form
A sheet holds one person per row (name, email, company, message) and the automation submits a contact form for each.
- 1.0
Enter custom data:Custom datais submitted. - 2.0
Read data from a Google Sheet: the contacts sheet, tabContacts. - 3.0
Remove results that contain certain words:Datais[google-sheet-data],Words (comma separated)is[custom-data]. - 4.0
Loop through data: loops over[word-removed-data]. - 4.1
Go to page: the form's URL. - 4.2
Enter text: the name field, from the current row. - 4.3
Enter text: the email field, from the current row. - 4.4
Enter text: the message field, from the current row. - 4.5
Click element: the submit button. - 4.6
Wait:2000milliseconds, so the submission completes before the page reloads. - 4.7
Find row in a Google Sheet: tabContacts,Values (comma separated)is the email column of the current row,Exact matchon. - 4.8
Write data to a Google Sheet:DATAis[custom-data], Add to existing data, starting cellE[find-row-google-sheet].
The marker is written after the form is submitted. A row whose submission fails is not marked, so it is submitted on the next run.
Tips
- Pick a unique value for the find. An email address or a URL works. A first name does not.
- Include the marker column in the read. Set
Last cellon the Read data from a Google Sheet step far enough to the right to include the marker column, or the filter cannot see the marker. - To run every row again, clear the marker column, or change the marker word.