How to automate Amazon Posts

In this guide, we’ll show you how to automate an Amazon Post in the Beta app. If you’re interested in learning more about browser automation and how it can be used to automate tasks throughout the Amazon ecosystem, this guide is a great starting point. It’s a simple bot that can be built in under five minutes - even if you’re a novice!
# Why learn to build bots to automate Amazon Posts?
Have you ever seen a bot do your work for you? This was one user’s reaction:
“Axiom is a wonderful no code solution for automation. When my first Axiom worked successfully, I was so happy I did a little dance!” 💃👇
Amazon automation frees up time and resources normally spent on routine tasks that can instead be used to focus on growing and scaling your business. Of course there’s a learning curve when it comes to building bots, but once mastered, you can automate much more than just Amazon Posts. (opens new window)
# What is a bot?
A bot is a program that automatically performs tasks for you on the Internet. Like a physical robot, it needs instructions, so you need to give it a set of instructions that tell it how to automate creating Amazon Posts.
# How are bots made using Axiom.ai?
With the help of Axiom’s no-code bot builder, you can easily make bots that combine steps to replicate your actions.. You can build as many bots as you want for any web-based application, not just Amazon. Without a single line of code!
# Can anyone make a bot?
The answer is yes! You don’t need to know how to code. If you’re completely new to this, keep following the guide and by the end you’ll have made a bot that automates Amazon Posts. We’re here to help if you get stuck.
# How do bots automate Amazon Posts?
The bot you’re about to make will automate the same web actions you perform when creating an Amazon Post. Bots work just like you: they open the browser window, click on the new post button, upload an image and insert the text before finally clicking the ‘Post’ button to complete the task.
# What else can you automate using bots in Amazon?
Don’t stop at your first bot, build yourself a workforce! Bots can be used to automate a range of tasks on Amazon from uploading an inventor to downloading reports. You can even automate posting to other social media platforms such as Facebook, Twitter or Instagram (add link to post). Once you master the art of bot building, you'll be able to automate any task.
# Dive in and make a bot to automate Amazon posts
Before you start, you need to install Axiom’s desktop app as this automation requires files to be uploaded. Click here to install.(opens new window) (opens new window)
Currently, bots can only work with files on the desktop. If you would like to see this feature on the cloud or elsewhere, please vote here (opens new window) (opens new window).
# 1. Install Axiom in your Chrome browser
If you haven’t yet installed Axiom and created an account, please go to the Chrome store and install Axiom now (opens new window) (opens new window).
By the way, we give all new users 2 hours of free runtime. This means you can build and run this bot a couple of times on us 🙂
# 2. Set up your Google Sheet
Create a new Google Sheet. You can do this in your Chrome browser by entering the shortcut 'sheet.new'.
First name your sheet 'Automate posting on Amazon', then add two new tabs to the sheet titled 'Post' and 'Posted.’
Finally add data to the ‘Post’ tab on your sheet. Each Post should be on a new row. In Colum A add the image path, Column B add the caption and lastly in Column C add upto 10 ASINS seperated by commas.
# 3. Launch Amazon Post and open Axiom
First, make sure you’re logged into Amazon Post in your Chrome browser. Then open up Axiom and click the '+ New Automation' button. You’re now going to start combining steps to build your automation.
# 4. Start from blank
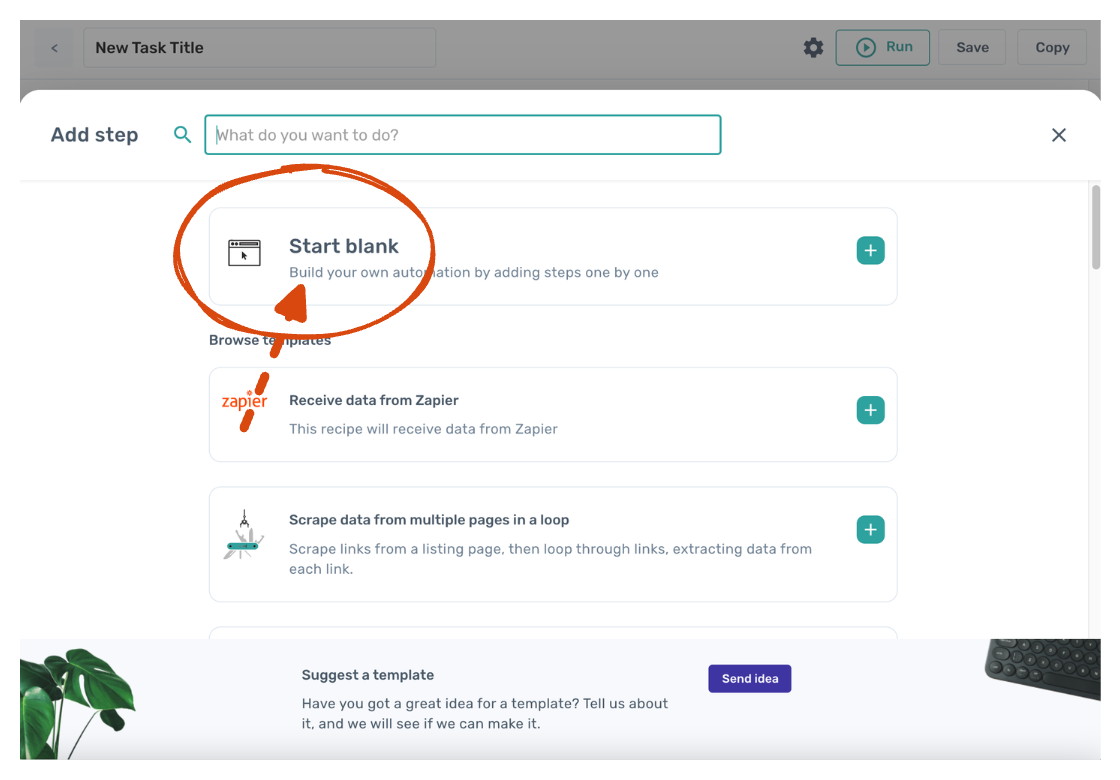
To build your bot from scratch, click on 'Start blank.'

# 5. Add your first step, ‘Read data from Google Sheet’
Using the Step Finder, click ‘Read data from Google Sheet’. The step will be added to Axiom for you to configure.
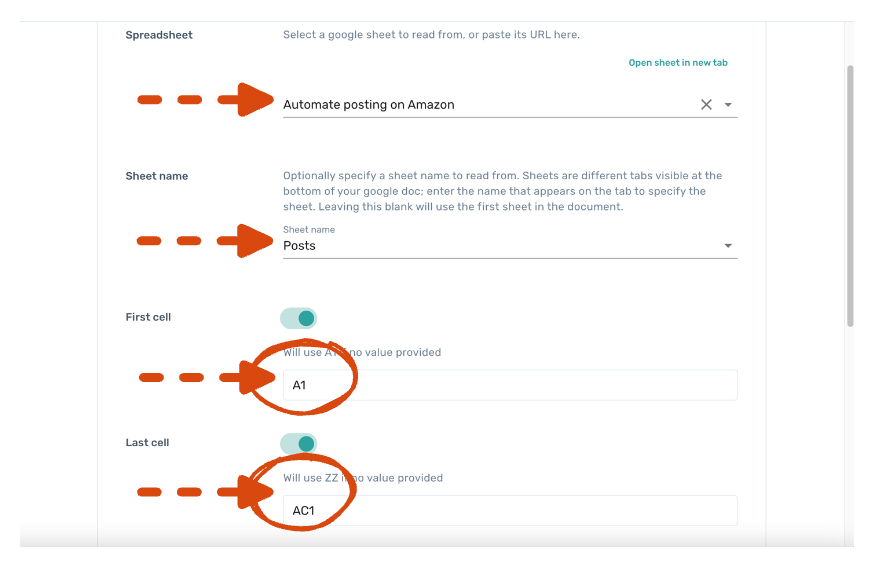
In the field called 'Spreadsheet', you can search for the Google Sheet you created. Once found, click to select.
For 'Sheet name' click on the drop-down and select the tab 'Post' with the test data.
On the first cell, toggle the switch and enter 'A1'. This setting tells the bot where to start reading data. In the example below, you would start with 'My first automated post' as the column titles fill row one.
On the last cell, click the toggle switch and enter 'AC1'. You have limited the bot to read a single row. We will set the boot to loop later on.

If you want to learn more about Google Sheet steps watch these videos.(opens new window) (opens new window)
# 6. Loop through data
Click ‘Add a step’ below the ‘Read’ step. Using the Step Finder, click on 'Loop through data' to add the step.

In the ‘Go to Url’ add Amazon’s Post url.
Inside the Interact step, click on the 'Add a sub step' button. The Interact step features a set of sub steps for automating browser actions like clicking a button.
Add the 'Click element' sub step.
Then, click on 'Select' and use our selector tool to highlight the ‘Create Post’ button on Amazon and click confirm.
Well done, you have automated a web action!
# 7. Add further sub steps
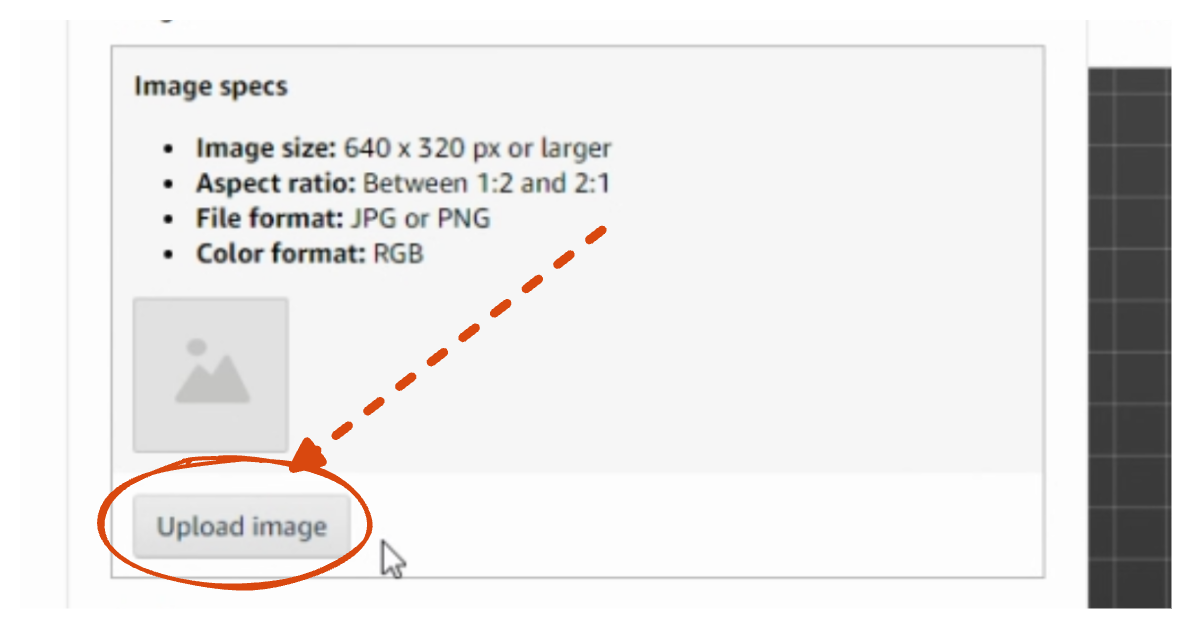
Your browser window should now be on the Create Post page. Add an 'Upload file’ sub step and select the button 'Upload image'.

In 'File path' click on the yellow icon 'Insert data' and select ‘Google-Sheet-Data’. A data preview will open. Select column A with the image path and save and close the preview.
Next, add a new sub-step called 'Enter text' and select the ‘Caption’ text field.
Now pass your caption from the sheet into the 'Enter text' step. Next, click on the yellow icon 'Insert data' and select 'Google-Sheet-Data'. A data preview will open. Select column B and save and close the preview.

Add one more 'Enter text' sub-step to pass in the ASINs from column C of the spreadsheet.
# 8. Now add a sub-step to submit the new Amazon Post
Add a last sub-step 'Click Element' and select the 'Submit for review' button.
# 9. Add a wait sub-step after the submit
Just for good measure, add a 'wait' sub-step after the bot clicks submit. Wait steps pause the bot to allow web apps time to finish saving. You may need to increase the wait if uploading a very large image.

# 10. Add a new step ‘Write data to a Google Sheet’ to record Posts sent
Add a new step (not a sub step) below the ‘Interact’ step by choosing ‘Write data to a Google Sheet’.
In the ‘Spreadsheet url’ field, search for the sheet you previously created.
For ‘Sheet Name’, select the tab called 'Posted'. This tab will keep a record of the Posts sent.
To do this in 'Data' select ‘Google-Sheet-data’.
# 11. Delete rows from a Google Sheet

Add the step ‘Delete rows from a Google Sheet' to delete the row of data that has been used to create the post. This is to prevent it from being posted repeatedly.
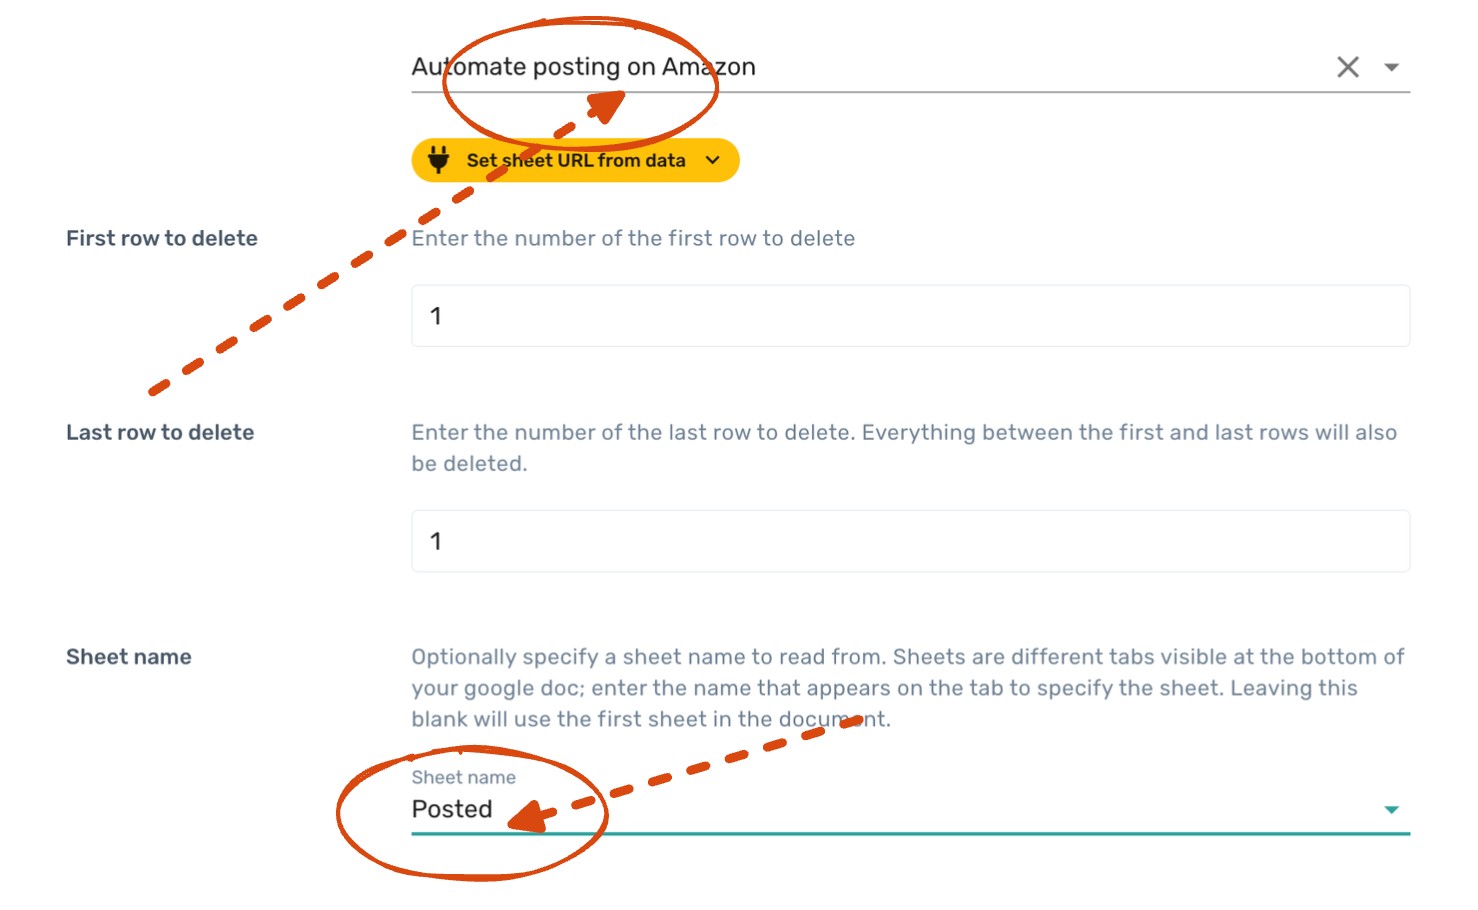
Using the Step Finder, search for and click ‘Delete rows from a Google Sheet’ in 'Spreadsheet url' to add the spreadsheet.
Then, in ‘First row to delete’ enter the number ‘1’ and repeat this in ‘Last row to delete’.
Set the ‘Sheet name’ to 'Post'.
Well done! The bot is complete and ready to test 👍
# Test run your Amazon Post bot
Before you do a test run, check that you disabled the sub-step that clicks ‘Post’. If not, make sure you do this now.
It's best practice to test every bot to check it’s production-ready. With the ‘Post’ button disabled, you can do a test run that will not send a Post.
We recommend test running your bot with the desktop app, but you can also do it in the cloud.
Things to check for:
- Does the image upload into the Post?
- Is the text entered into the Post?
- Is the Post saving?
Go ahead and click ‘run’. Get ready for some magic.
# Debugging your Amazon Post bot
If you experience any issues with the bot not clicking buttons, try re-selecting the button or text input. To change the selection, move the cursor slowly over the object and re-select.
The Click step also has a handy feature that allows you to select the button by the text, which can resolve many issues.
If the submit button is clicked, but the Post is not saving. Make sure you have added the wait in step 9, increasing the time until the Post saves.
Don't forget we have excellent customer support. If you need help, get in touch. https://axiom.ai/customer-support (opens new window)(opens new window)
# Conclusion
Now you’ve built and run your first bot automating Amazon, why not use your new super power to automate other tasks? Another popular use of Axiom in the Amazon ecosystem is to automate the download of reports.
If you do get stuck or need some guidance, we are here to help. Simply post your request here https://axiom.ai/customer-support (opens new window)
# What else can I automate with Axiom.ai?
Axiom is a powerful browser automation tool. If you're excited, here are some ideas for other bots: such as scraping Amazon including extracting scraping Amazon book data.